Banner image

Achilles Tang DIY 300 curved Tank Build (1 Viewer)

Achilles Tang

Reef Automation Junkie
Lifetime Member
Joined
Feb 28, 2007
Messages
899
Location
Rosemount, MN
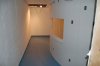
Well after a year of routing, shaping, forming etc… the oval room is finally done. (to preface this part my home is only 3 years old) In the process I jack hammered up my basement floor and routed floor drains and a laundry sink to the new aquarium mechanical room, removed and reworked all the plumbing and heating in the basement. And of course built a lot of curved walls and ceiling. I have attached a picture of the current state of the room. As I plan on building the tank I do not want to install any of the cherry wainscot on the walls until after the tank is in and water tested. So that is why the bottom half of the wall is incomplete. There is a cherry door off one of my laundry cabinets to show my wife what the colors will look like as well as what the wainscot will look like. The overall room is 18 x 24. We have decided to make it a home theater (the acoustics really turned out nice) so one side will have a 8’ X 2’ view to the reef tank and the opposite side will have the screen for the projector.

The fish room will be a completely separate climate controlled environment from the rest of the house. The front wall will have FRP, the back and sides are exposed concrete with a white epoxy coat. The floor will be coated in a blue epoxy and the ceiling is suspended with NSF rated ceiling tiles. The entrance has an exterior grade door. The room is going to start with a single exhaust fan and 4” fresh air; however the ceiling grid has been designed to accommodate Panasonics single room HRV should humidity become an issue. I brought 5 20 amp circuits into the room and also wired all my Neptune com lines into the walls so I don’t need RJ45 cords running all over the walls. Additionally there is a pair of network lines coming into the room from our central media panel so I can set up email and log onto the system from our upstairs office or remotely.

The tank, ahhhh, the tank. I have priced it several times glass is well in to the high 4 figures. Acrylic is 4k-6k. So I spent some time reading (like maybe 60 hours) then I spent some time experimenting with forming acrylic and building a hobbyist sized ovens. And now in the next months I will be building the tank. The overall tank is roughly 92 long not including the exterior wave boxes. It 37” deep at its longest point and 26” deep in the middle. I decided to keep it shallow because of the shape so it will be 25” tall.

So at the very minimum this may be a fun thread just for the tidal wave possibilities…

I attached a photo bucket link of the room build for those of you that find that part interesting.

This weeks agenda; Order the acrylic, epoxy the walls and floor and FRP the front walls. If all goes well I hope to start welding up the stand by Sunday.

http://www.tcmas.org/forums/attachment.php?attachmentid=1902&d=1227749711

http://s634.photobucket.com/albums/uu67/ChadR024/?albumview=slideshow
 
This is going to be just stunning. Great ideas you have and hope everything will work out just the way you want it.
Congrats to a great start
 
Noah was at the store today. We were just talking about how you were done with welding... so much for that promise to yourself... though I suppose its different when its for your own projects :)
 
Noah was at the store today. We were just talking about how you were done with welding... so much for that promise to yourself... though I suppose its different when its for your own projects :)

You have to be happy to see this project headed down the final leg. You've been listening to me talk about it from the first day we met in your basment to talk about your plans to start selling coral. And thats got to be a few years now.
 
Thanks everyone for the kind words

Well the first week went fairly well. I secured a Orca off RC, picked up the Acrylic for the tank build, installed FRP on the front walls of the fish room, installed two coats of acrylic paint on the masonry walls, Installed the suspended ceiling, and expoxied the floor.

I’ve been going back and forth on the stand this week and believed I settled on a wood & steel hybrid. It is just too time consuming and costly to arch the front of the frame on a steel stand. So I plan on building a steel I beam system with adjustable legs and then frame the top out of engineered wood.
I’m very excited about an auto water change system I found on RC one evening this week. I had planned to have an automated 75 gallon water change system. (Dump 75 fill 75) However I found a design that does daily water changes in smaller volumes. The system is adjustable so I’m thinking of having the aquacontroller cycle ½ gallon of saltwater ever two hours for 6 gallon change daily.

A couple of pictures for this week.
 

Attachments

  • Acrylic sheet for tank build.jpg
    Acrylic sheet for tank build.jpg
    201.2 KB · Views: 178
  • Aquarium Mechanical room 3 8 09.jpg
    Aquarium Mechanical room 3 8 09.jpg
    136.8 KB · Views: 224
Last edited:
Damn, if I ever am able to get a tank back at my house again, you are so doing it for me!

How much room are you going to have behind the tank?
How are you going to move the lighting out of the way?

:beerchug::beerchug::beerchug:
I'm on this thread like Rain on a bowl of freshly fried Hot Peppers!:biggthumpup:
 
How much room are you going to have behind the tank?
How are you going to move the lighting out of the way?
:

I'll have about 26" directly behind the tank. (Which I tested before construction and seams to be more than enough room to walk in. This may be the perfect incentive to not let my belly grow any more:gay1:) Otherwise the room opens up quite a bit on each side because of the shape.

I plan on using two Current USA hqi / T5 fixtures 48" long they’ll each be on a separate track and slide out to the sides.
 
I was wondering about that as well, doesn't seem like much room. What is the tank width at that narrow point?
 
I was wondering about that as well, doesn't seem like much room. What is the tank width at that narrow point?

25" at its narrowest point 36" at the ends. I know 24" sounds small but you would be surprised how many homes have 24" doors in them people walk through just fine. When I was deciding how small I could make the transition point from side to side I built prototype tank back and walk behind it, tested what working on it would be like etc.. The photo creates a little of an optical illusion the room is 19' deep as your looking at it.
 
Wow Chad that is going to one heck on a tank, cant wait to see it up and running.

Ken
 
OMG it is awesome!! What did mama say about this all? Absolutely love it al. What did you say the size of the tank and sump is? Bravo!!!:greenguy:
 
OMG it is awesome!! What did mama say about this all? Absolutely love it al. What did you say the size of the tank and sump is? Bravo!!!:greenguy:

We both wanted to finish the basement a few years back. However we have spent the last two years negotiating the tank size. She started at 55 and I started at 750. We met in the 300's. The one thing she was sold on immediately was to have an in wall tank that came with the promise that "All my fish stuff” would be in a room out of sight. I will probably tweak the tank size until the day I cut the sheets but at this moment I’m sitting at 325. The sumps about 55.
 
Well…….. Let me tell ya about my afternoon. The story starts Friday when I completed the oven and began running tests on temp & heating times for ¾” acrylic. Most of Saturdays was spent bending acrylic and dialing in the controls on the oven. Everything was working perfect. I decided this morning to add two windows to the oven so I could see the acrylic drooping and then better judge my clamp time etc… I covered the form in felt and put one last large scrape in for a final test, this scrap was a full 100” long and about 14 inches wide very close to the size I would be bending. It needed to heat for a total of 75 minutes and then I would clamp it to the form. (Add a little scary music here) 60 minutes into the heating something went wrong I looked up and smoke was starting to come out the exhaust stack. I immediately shut down the oven. Now I had the good sense to at least build this thing on wheels so I could get it out of my garage in a hurry. As I’m deciding if we are at that point a bust of fire comes out the exhaust stack. Oh ooooo I walk into the kitchen and hand my wife the five gallon pale hunny could you fill this and bring it outside. I go back into the garage and roll my natural disaster into the driveway. I’m pretty sure that I have a back draft situation on my hands and as soon as I open the oven and expose it to air there is going to be a large fire if the wooden mold is what is burning. I go back into the house tell my wife I’ll take the bucket now. Her curiosity is beginning to stir. I go into the driveway put on my welding gloves and open the oven door, my wife of coarse walks out at this time and asks what’s going on. A flame about 5 feet tall burst out the top. I carefully dump my bucket in the trouble areas. Ask my wife if she would mind getting the fire extinguisher out of the laundry room and proceed to put out the towering inferno. About the time I finish extinguishing the flames I hear my wife say CHARMING. She has been dealing with the mad scientist for 25 years now. We laughed. My wooden mold is charred but still salvageable it was not the source of the fire. I believe that one of the variable temp heat guns I was using to heat with failed. It is all speculating because everything is CHARRED and I’m not and arson specialist.
So we are now onto plan #2 of having a professional bend the front piece for me. Luckily most of the equipment and pieces for the project have been collected from jobsites and so forth over the past 3 years with the anticipation of this project. Total loss this afternoon about $200.00
On a side note the fish room is looking good and I got my new weld on 42 gun / system. So we will see how quickly I can get my piece back from the fabrication shop.
Thought you might enjoy a little Sunday afternoon drama. Additionally this is not a rant we had a good laugh hear today. I knew this was a possibility.
Stay tuned for more crazy scientist stories…..:biggthumpup:
 
Oh dear... I did see the flames from over here...If you ever need help I'm good with flooding :) Ask my boss how many times he's opened the store to a mild size puddle hehe
 

Users who are viewing this thread

Back
Top