Banner image

VikingsCrazy's 120 Fat Boy (1 Viewer)

VikingsCrazy

I contributed!
Lifetime Member
Event Committee
Joined
Aug 30, 2018
Messages
1,262
Location
North Mpls.
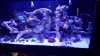
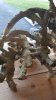
Hey everyone! I figured since I am putting water in my tank I should show you all how us scavengers do it. Never done a thread like this so please bear with me. Everything in this build is someone's hand me down or I do not want it anymore equipment. With the exception of the sump I purchased from a VERY generous TCMAS member. I guess I should start with equipment:

120 gallon corner overflow with beat up old stand
Waterbox sump (yeaaah!)
Jaebo 12000 DC return pump
Diablo 200 int skimmer
Tunze ATO & water level alarm systems
Reef Keeper Elite(I'm broke)
(3) 165watt led lights
300watt dimmable grow light for sump
Ranco commercial heating controller with 500watt Finnex heating element
DC wave maker
(2) Vortech MP10's
George Fischer Wye check valve

20180920_140258.jpg
20181101_142334.jpg
This is what I started with! ☝ More to come!
 
First things I did were to clean the tank, sand, and equipment. Then paint both the stand and the back of the tank. I also painted the inside of the stand with Kilz and siliconed any lower seams. Next was reefscaping! One of my favorite things to do. I couldn't resist seeing what it would look like, so I put it in the tank. LOL

20181018_174612.jpg 20181018_174629.jpg 20181015_164704.jpg 20181014_224608.jpg 20181018_170259.jpg 20181018_170413.jpg 20181019_152801.jpg
 

Attachments

  • 20181018_170332.jpg
    20181018_170332.jpg
    2.7 MB · Views: 15
Last edited:
Arrghh! Just spent 2 hours trying to get those rocks in the tank the way they are in the pictures with no success. Frustration has set in. There is always tomorrow.
 
Thanks Mike! I got it from a member that had it hiding away for a rainy day. I am very happy they decided to part with it. The member shall remain nameless. That way the boss lady can never ask them how much I paid for it!
 
Last edited:
Ok...Next ofcourse was plumbing, upgrading the corner overflow to a herbie, and installing gadgets. Then the skimmer went in to place and the the tank came inside. I took everyone's advice and bleached the rock. I also insulated the pipes to hide them, cut down on vibration, and keep the water warmer throughout winter because this tank is in the cold basement.

20181102_155030.jpg 20181021_190302.jpg 20181021_185716.jpg 20181021_203805.jpg
 
Now that’s a unique backdrop for the tank!!! Very cool!

It may be a tad late, but here’s a tip I usually recommend... black pvc pipe and fittings whenever possible.
With having a dark backdrop and black trim on your tank, having the returns made with black fittings would’ve almost made the returns disappear.
If interested, I buy my black fittings from Savko or PVC Fittings Online. They’re both reasonable priced, but sometimes the shipping costs can equal the order cost; just keep that part from the SO. ;)
 
Thanks! I had the same idea. Eventually all the plumbing including the herbie pieces will be black. I started cheap with what I had, but in the next couple months it will be upgraded. The backdrop is more to keep the wall safe.
 
Couldn't sleep so I guess I will fast forward you all almost up to date. On Wednesday of this week I added the sand/crushed coral and started filling it for a leak test. Yes, both sand and crushed coral. I wanted to try something different this time. Having sand in half and crushed coral in the other half will allow me to do some experimenting and give me a different look. It will allow me to test how corals grow on different substrates and also allow me to observe to see how animals act on top of and move under or thru different substrates.
20181102_164025.jpg
Then on Thursday I added Dr.Tim's one and only. On sale at chewy for half price right now for anyone setting up. I also added a circulation pump and a heater. Then on Friday as most of you know I attempted the aquascape pictured above. Here is a pic up to the point of frustration.
20181103_105744.jpg
I finished the majority of the aquascaping last night and will be starting to cycle thru the sump today hopefully. Cross your fingers! I will have you up to date and have a pic of the final result of my aquascape later today. Time to check my fantasy football! Bye
 
The tank is full! Aquascape finished as much as possible. Live rock will be here Friday. I am about 1 hour from turning on a return pump. Just mixing the last of the water. Then tomorrow i will start plugging in gadgets. This guy is getting excited!!

20181105_181910.jpg 20181105_181924.jpg
The 40 breeder is bulging at the seams with all the beauties waiting for their new home.
20181103_192644.jpg
It looks like I trained my fish to be on que for photos, but I promise you I am not that slick. ;)
 
It has been over a month now since I have posted here. I guess I am not too good at this. Since last we met I have cycled my tank. To do so before filling each day for 10 days I removed 5 gallons of seasoned water from the 40 breeder. Kind of a pain in the you know what moving pumps in and out of buckets to keep water from stagnation, but I fell it is well worth it. I added 50 gallons of seasoned water to 70+ gallons of premixed saltwater to fill. I took sand, rubble, and chaeto from the sump of the 40 breeder and put it in the 120 sump. I then blasted the tank with every bacteria I could find. I added Dr.Tim's, seachum start up, coraline algae in a bottle, tunze care bacter, and planned an order of some Florida live rock from Salty bottom. After a couple days I knew the bacteria was thriving so I ordered my live rock (ocean bacteria and ammonia in one). The die off will produce ammonia so I do not have to add any.
 
Last edited:
Debbie and Tom from Salty Bottom are great people and will answer any questions you have. I asked for smaller pieces some with Macro and sponges and they did not disappoint. The day the live rock was coming it felt like Christmas! I was so excited for rock with creatures and corals I was like a little kid for a day. I chose the option of picking my rock up at the airport. This allows for less handling and it is in a temperature controlled environment so there is less die off. My rock was harvested from the ocean on Tuesday or Wednesday and was in my tank by Friday night.

I took every rock out piece by piece. Inspected it for moving critters and poked and prodded every hole and nook and cranny. A couple undesirable crabs were found, but I also found hermits, snails, porcelain crabs, and many limpets. The rock was also covered in Macros, some corals, one weird looking bubble anemone, and many many different tunicates and sponges. I love sponges and tunicates so I was very happy. Once I was as sure as I could be that I was rid of pests I added the predominantly coral covered rocks and the Nem rock to the tank and the sponge and tunicates covered rocks to the sump.
20181211_144749.jpg 20181211_144737_001.jpg 20181211_144718.jpg 20181211_144129.jpg 20181211_144214.jpg 20181211_144123.jpg 20181211_144244.jpg
I know this is what you have been waiting for ;) PICTURES!
 
The only one I have I am not very happy with. I am kinda lazy so I only have one of the lights hanging over it to keep stuff alive. My first led light, but I am also not very happy with them. They seem to beam colored light lazers in to random spots in my tank. I took the plastic covers off the bulbs which helped to spread out the color, but it makes for a bad picture. Any thoughts on how to get rid of the beams of colored light? I guess you can have the bad pic ;) Better pics to be added later.
 

Attachments

  • 20181211_144701.jpg
    20181211_144701.jpg
    4.8 MB · Views: 23

Users who are viewing this thread

Back
Top