
Pomacanthus
Senior Member
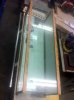
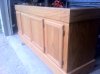
I sold this tank to good friend of mine in 1993 and recently bought it back. Its considered a "brick tank" back in the day when used properly sized glass (1/2"). Im going to attempt to make it rimless by removing the upper trim, the bottom faux oak trim is completely hidden by the stand design. The stand itself is like new believe it or not, cant decide if i want/need to refinish it may just leave it as it (since its technically done). The system will feature auto water replenishment that is progressive via gravity. I dont like wasting expensive water so here is the path: 135Gl reef ->Refugia->300 Gl quarentine/holding system->120GL softie tank (lower basement)->floor drain. This way my NaCl H20 gets recycled 3X thru 3 different systems in order of importance- I have the perfect and unique elevations in my home to accomplish this and i hope to show it to the forum someday when its finished. System will also feature custom built progressive counter current limewood airstone driven skimmers (also from 1993 Peter Wilkens would be smiling lol) They are 4 ft tall so IOW the first skimmer feeds the 2nd skimmer for maximum efficiency. This build should almost be called old school/new school because i want to feature both 17 yr old technologies and modern day combined into my creation. The skimmer arrangement is absolutely idea when using 03 for obvious reasons. I may put a Del Tek on there someday just for kicks if I think its necessary, but striving to get by without it. I havent got any thing else nailed down yet except for what Ive mentioned so far- i need to finish Reef Aquarium Vol 3 before i make too many more decisions. I will update this thread as build continues. Thanks Pomacanthus
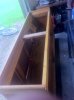


") Im adding a "rail" in between the overflows so i can slide a piece down as a divider so if i have a cool fish spawn i only have to tear down 1/2 the tank:beerchug: The "rail" will hardly be noticeable basically 2 x 1/4" x 1/4" acrylic strip to form a channel to hold the divider in place. Also need to add supports inside the overflows to support eggcrate on top of the drains allowing me use polyfilters, or pura pad as a prefilter. Basically will be an eggcrate shelf about 1" below the top of the overflow, makes is so easy to remove/replace no wet knees and achy breaky back crawling around down in the sump. Just rec my high quality american silicone via CR Laurance so Im ready to reseal as soon as i find some more time!
Im adding a "rail" in between the overflows so i can slide a piece down as a divider so if i have a cool fish spawn i only have to tear down 1/2 the tank:beerchug: The "rail" will hardly be noticeable basically 2 x 1/4" x 1/4" acrylic strip to form a channel to hold the divider in place. Also need to add supports inside the overflows to support eggcrate on top of the drains allowing me use polyfilters, or pura pad as a prefilter. Basically will be an eggcrate shelf about 1" below the top of the overflow, makes is so easy to remove/replace no wet knees and achy breaky back crawling around down in the sump. Just rec my high quality american silicone via CR Laurance so Im ready to reseal as soon as i find some more time!


