Oh yeah you’ve got the right idea. That sucks!
Navigation
Install the app
How to install the app on iOS
Follow along with the video below to see how to install our site as a web app on your home screen.

Note: This feature currently requires accessing the site using the built-in Safari browser.
More options
-
TCMAS Spring Saltwater Expo 2026
The pre-sale forum is open for the spring expo!First, read the pre-sale rules!Then head to the pre-sale forum
You are using an out of date browser. It may not display this or other websites correctly.
You should upgrade or use an alternative browser.
You should upgrade or use an alternative browser.
Reef #2 - The Unplanned Upgrade (1 Viewer)
- Thread starter Varig
- Start date
Varig
Senior Member
BOD
Lifetime Member
Event Committee
TCMAS Member
TCMAS Supporter
Meeting Host 2022
Meeting Host 2023
Meeting Host 2024
Meeting Host 2026
Meh, it is what it is. I suppose I could go back and try to match the blue ") . Or I'll just suck it up and do the black acrylic. Bigger fish to fry
. Or I'll just suck it up and do the black acrylic. Bigger fish to fry
. Or I'll just suck it up and do the black acrylic. Bigger fish to fry Varig
Senior Member
BOD
Lifetime Member
Event Committee
TCMAS Member
TCMAS Supporter
Meeting Host 2022
Meeting Host 2023
Meeting Host 2024
Meeting Host 2026
I know I’m slow, but some huge progress has been made. I’m getting close.
First, I got all the sand washed last week. What a pain in the butt. I did end up using my phosban reactor because it allowed me to get the water velocity high enough to clear the small stuff super fast. Yes it was a pain to do 2-3 cups at a time for 80lbs, but I think it was faster than the bucket because of how much water flow I could get to lift those small particles.
Sump plumbing all done including the UV and the ATS in there. I’m happy with how it all turned out.


And last but very much not last, tonight I got the big thing I was dreading done, tank relocation. A buddy came over to help. I drained the original tank down to ~10 gallons left, just enough room for the fishies to swim. Then we moved it over. And the new tank is in position.

Super excited. I needed some of my new saltwater to get the old tank back full, so I’m making water again to make sure I have the 80-90 gallons to get the new tank filled up. It’s getting real feeling now. Pictures with water hopefully in the next couple days.
First, I got all the sand washed last week. What a pain in the butt. I did end up using my phosban reactor because it allowed me to get the water velocity high enough to clear the small stuff super fast. Yes it was a pain to do 2-3 cups at a time for 80lbs, but I think it was faster than the bucket because of how much water flow I could get to lift those small particles.
Sump plumbing all done including the UV and the ATS in there. I’m happy with how it all turned out.
And last but very much not last, tonight I got the big thing I was dreading done, tank relocation. A buddy came over to help. I drained the original tank down to ~10 gallons left, just enough room for the fishies to swim. Then we moved it over. And the new tank is in position.
Super excited. I needed some of my new saltwater to get the old tank back full, so I’m making water again to make sure I have the 80-90 gallons to get the new tank filled up. It’s getting real feeling now. Pictures with water hopefully in the next couple days.
Progress feels good doesn’t it! Congrats!
Varig
Senior Member
BOD
Lifetime Member
Event Committee
TCMAS Member
TCMAS Supporter
Meeting Host 2022
Meeting Host 2023
Meeting Host 2024
Meeting Host 2026
Sure does. Especially when you’ve been delaying this step for weeks
reef junkie
Senior Member
Congrats on the big move. Love the look of the new setup.
Varig
Senior Member
BOD
Lifetime Member
Event Committee
TCMAS Member
TCMAS Supporter
Meeting Host 2022
Meeting Host 2023
Meeting Host 2024
Meeting Host 2026
Thanks. I’m still going to build a hood to prevent light spill. Need the final light height first. And I guess to decide if I’m just filling from top of tank to bottom of light (like my current tank) or if I’m going to do a full hood up to the light mount (home supervisor will need to weigh in ).
Also going to build a couple fill pieces to fill the space from the tank to the wall. Something easily removable. But something to make that look nicer. Slowly but surely.
). Also going to build a couple fill pieces to fill the space from the tank to the wall. Something easily removable. But something to make that look nicer. Slowly but surely.
Reefer Oz
Keep reefing HARD!
BOD
Lifetime Member
Event Committee
TCMAS Member
TCMAS Supporter
Meeting Host 2021
Meeting Host 2022
Meeting Host 2023
Dooood! Gotta leave some bits and pieces dangling for your meeting!


Love your progress, ambition and disclosure of details/process. I for one am super excited to see how you been reefing soon.


Love your progress, ambition and disclosure of details/process. I for one am super excited to see how you been reefing soon.
Thanks. I’m still going to build a hood to prevent light spill. Need the final light height first. And I guess to decide if I’m just filling from top of tank to bottom of light (like my current tank) or if I’m going to do a full hood up to the light mount (home supervisor will need to weigh in
Also going to build a couple fill pieces to fill the space from the tank to the wall. Something easily removable. But something to make that look nicer. Slowly but surely.
I built a trim piece to match the tank I gather didn’t make its way to you. It caught most of the light spill and still allowed room to feed etc. I have one on my new tank as well. Basically just some 1/2”x6” boards and some 1x1 to hold it on the tank. Not as nice as a full canopy but makes for easier daily stuff.
EDIT: DOH helps if I look at your pics, you already have one haha
EDIT 2: DOH that’s on your old tank!
Attachments
Reefer Oz
Keep reefing HARD!
BOD
Lifetime Member
Event Committee
TCMAS Member
TCMAS Supporter
Meeting Host 2021
Meeting Host 2022
Meeting Host 2023
Love this so much!EDIT: DOH helps if I look at your pics, you already have one haha
EDIT 2: DOH that’s on your old tank!


Varig
Senior Member
BOD
Lifetime Member
Event Committee
TCMAS Member
TCMAS Supporter
Meeting Host 2022
Meeting Host 2023
Meeting Host 2024
Meeting Host 2026
Hahaha, both these made me laugh. Now you have me wondering if I need to just tease the tank with rock and water in it .
Re: Ben and the hood. That is definitely the idea. It worked once, why not again. However, I’m thinking the light will be a good bit higher this time. So I’m thinking a more full hood might make sense. For sure I’m thinking to go tall enough that I can have doors on the front for easy access. We’ll see once the light is on and par is measured.
Thanks for the strong encouragement guys!
. Re: Ben and the hood. That is definitely the idea. It worked once, why not again. However, I’m thinking the light will be a good bit higher this time. So I’m thinking a more full hood might make sense. For sure I’m thinking to go tall enough that I can have doors on the front for easy access. We’ll see once the light is on and par is measured.
Thanks for the strong encouragement guys!
Varig
Senior Member
BOD
Lifetime Member
Event Committee
TCMAS Member
TCMAS Supporter
Meeting Host 2022
Meeting Host 2023
Meeting Host 2024
Meeting Host 2026
Okay, because of the chastisement from @Reefer Oz that I was giving away too much before the meeting, I stopped with updates. And then fell WAYYYY behind. So prepare thyself for an update of epic proportions. Probably I'll split it into a couple of posts for my own sanity. Long story short, in my last actual update you saw that I got the tank physically into position, which was a pain. Early the following week (getting back from Thanksgiving travel) it was time to bite the bullet and fill up the tank. I pulled out my new scape from the dark cure (in total it got 68 days of cycling, adding various bottled bacteria and AF Life Source mud, along with ammonium chloride as previously mentioned. It was processing ammonia well...as in the nitrates in the water were like north of 100ppm. I figured it wasn't a big deal since I wasn't using any of that water in the actual start up, BUT I still did a couple 50% water changes in advance of the move to get the nitrates in the ~20ppm range, just so I didn't shock stuff. I believe I also mentioned I was using lanthium chloride to drop the phosphates. Even with the acid/bleach, they still climbed to ~0.35ppm, so I kept dosing little bits of lanthium which would bring the water level down to 0.2ppm, then the rock would bring it back to 0.25ppm, then water to 0.15ppm...you get the drill. Anyway, it was holding steady about 0.1ppm at the transfer. Not crazy low, but I didn't want zero either.
Long story short, we got the scape in the empty tank, arranged it to be pleasing to the eye, then added the sand. I used 20 lbs of carib sea special grade live sand (because I had it) then another ~40 lbs of the dry sand I washed. I'm still a little annoyed that I washed the full 80 lbs of sand...only to need 40lbs. But I digress. I don't know if it was smart or not, but when I got the sand in there I mixed in some little chunks of the AF Life Source Mud in various places, mixing and breaking it up with the sand. I guess my thought process was, if there is good bacteria in the life source mud, let's get it in intimate contact with the sand ASAP. We then started filled the tank:


It was stirring up a little cloudiness, but nothing too crazy. I used a marked 5 gallon bucket and pumped the water into the tank 4 gallons at a time (so that the pump never ran dry). In this way I was able to determine exactly how much water I put in the tank. You'll recall, the tank was rated at 65 gallons and the sump is a Trigger 26. I knew I would lose some volume with the rocks/sand, but I still assumed I would be in the ~70-75 gallon range (assuming ~10-15 gallons in the ~1/2 full sump. Well...I was wrong. All told it took 62 gallons to fill. I didn't think the sand/rock would displace so much, but I never did the math. The reality is a 2" sand bed (if it was fully sand) is like 7-8 gallons in this tank's footprint. I don't know what the fill ratio is, but even at like 50% that's 3-4 gallons gone off the top. Let alone the volume of the rock. The other reality is that 65 gallons is likely an estimate in itself. My rough measurements put a FULL tank at ~60 gallons, and the water is down ~1.5" from the top = 55 gallons. So again, if a person REALLY thinks about it, the 62 gallons to fill passes the sniff test. Why does any of this matter? Because I'm a giant nerd, that's why. So there! Anyway, the full, cloudy tank:

With all that setup I got the return pump running and started checking for leaks. And to my delight (and amazement) I haven't found any yet (knock on wood). I obviously did the leak testing in the garage, so I wasn't super concerned about it, but I didn't know for sure I got the unions all tight etc., so it has been a relief to have it running smoothly so far. With that all setup, it was time for bed.
The water had basically fully cleared by the following morning, and I was extremely happy with the setup. I decided to let it run for a few days before doing the transfer of the fish, but I didn't have much time with my meeting coming soon. In the end I pulled all the coral from the old tank (putting it back into my QT tank) and then the fish. That caused me some stress. The clowns and Benggai were easy to catch, I didn't even have to pull out rock. I couldn't find the Starry Blenny, so I figured I'd start pulling out rock to find him. I pulled out the left half of the scape, looking it over and I didn't see him. BUT as I went to put it into a temporary bin I saw him, buried DEEP in a rock hole (He was NOT a fan of me by this point I'm sure). I wasn't sure how to get him out so I put the rock back in the tank...but in doing so the two pieces came apart in my hand. Thankfully I was holding each piece so it didn't get away from me and knock into the tank, and on the bright side, the blenny came out. Doh. But, I scooped him up pretty easily from there. Then I pulled out the other structure where my yellow watchman goby/pistol shrimp live. Shrimp was easy, goby was by FAR the hardest fish to catch. At this point there was no rock in the tank and he was STILL a fast little bugger. Regardless, I got him and got those all drip acclimated (incase anything was different with the new DT) and then added them all. All that was left was the yellow coris wrasse, my jumping devil, who was buried in the sand. Someone mentioned that a light would "stun" them, so I had my daughter holding a flashlight and I rustled him up out of the sand. I don't know if the light helped, but he darted around a bit and then seemed to calm down a bit. So in the end he ended up being pretty easy to catch as well. And with that, all the fish were safely in the new tank. Whoop.

You'll see I also got the light hung over the tank, the 80/20 stand worked great and looks great (but I'm biased). The only thing left to do was to break down the old tank. I did that over the course of a few days, and as no one cares about that I won't go into detail. The only point I will make, for my own records, is that I pulled all the snails/urchins out, scrubbed the worst of any algae off their shells and transferred them to a 5 gallon tank with some sand/rock from the old DT along with a heater, powerhead, etc. I put that tank in the dark and my thought process was that they would eat the algae off the rock (to stay fed) and off each other to clean up. And the dark would help kill off any remaining shell algae as well. I'm happy to report that plan seems to be working great. The snail shells are nearly all perfectly clean. The only sad part is that I lost 1 of my 3 urchins in this process. I'm positive it wasn't lack of food, so I'm assuming maybe I messed up with salinity and he couldn't handle it? Or he just didn't like the stress of the transfer? I dunno, but it made me sad to be sure.

Regardless, I was extremely happy to have the fish in the tank. And with that, I think I'll end this post.
Long story short, we got the scape in the empty tank, arranged it to be pleasing to the eye, then added the sand. I used 20 lbs of carib sea special grade live sand (because I had it) then another ~40 lbs of the dry sand I washed. I'm still a little annoyed that I washed the full 80 lbs of sand...only to need 40lbs. But I digress. I don't know if it was smart or not, but when I got the sand in there I mixed in some little chunks of the AF Life Source Mud in various places, mixing and breaking it up with the sand. I guess my thought process was, if there is good bacteria in the life source mud, let's get it in intimate contact with the sand ASAP. We then started filled the tank:
It was stirring up a little cloudiness, but nothing too crazy. I used a marked 5 gallon bucket and pumped the water into the tank 4 gallons at a time (so that the pump never ran dry). In this way I was able to determine exactly how much water I put in the tank. You'll recall, the tank was rated at 65 gallons and the sump is a Trigger 26. I knew I would lose some volume with the rocks/sand, but I still assumed I would be in the ~70-75 gallon range (assuming ~10-15 gallons in the ~1/2 full sump. Well...I was wrong. All told it took 62 gallons to fill. I didn't think the sand/rock would displace so much, but I never did the math. The reality is a 2" sand bed (if it was fully sand) is like 7-8 gallons in this tank's footprint. I don't know what the fill ratio is, but even at like 50% that's 3-4 gallons gone off the top. Let alone the volume of the rock. The other reality is that 65 gallons is likely an estimate in itself. My rough measurements put a FULL tank at ~60 gallons, and the water is down ~1.5" from the top = 55 gallons. So again, if a person REALLY thinks about it, the 62 gallons to fill passes the sniff test. Why does any of this matter? Because I'm a giant nerd, that's why. So there! Anyway, the full, cloudy tank:
With all that setup I got the return pump running and started checking for leaks. And to my delight (and amazement) I haven't found any yet (knock on wood). I obviously did the leak testing in the garage, so I wasn't super concerned about it, but I didn't know for sure I got the unions all tight etc., so it has been a relief to have it running smoothly so far. With that all setup, it was time for bed.
The water had basically fully cleared by the following morning, and I was extremely happy with the setup. I decided to let it run for a few days before doing the transfer of the fish, but I didn't have much time with my meeting coming soon. In the end I pulled all the coral from the old tank (putting it back into my QT tank) and then the fish. That caused me some stress. The clowns and Benggai were easy to catch, I didn't even have to pull out rock. I couldn't find the Starry Blenny, so I figured I'd start pulling out rock to find him. I pulled out the left half of the scape, looking it over and I didn't see him. BUT as I went to put it into a temporary bin I saw him, buried DEEP in a rock hole (He was NOT a fan of me by this point I'm sure). I wasn't sure how to get him out so I put the rock back in the tank...but in doing so the two pieces came apart in my hand. Thankfully I was holding each piece so it didn't get away from me and knock into the tank, and on the bright side, the blenny came out. Doh. But, I scooped him up pretty easily from there. Then I pulled out the other structure where my yellow watchman goby/pistol shrimp live. Shrimp was easy, goby was by FAR the hardest fish to catch. At this point there was no rock in the tank and he was STILL a fast little bugger. Regardless, I got him and got those all drip acclimated (incase anything was different with the new DT) and then added them all. All that was left was the yellow coris wrasse, my jumping devil, who was buried in the sand. Someone mentioned that a light would "stun" them, so I had my daughter holding a flashlight and I rustled him up out of the sand. I don't know if the light helped, but he darted around a bit and then seemed to calm down a bit. So in the end he ended up being pretty easy to catch as well. And with that, all the fish were safely in the new tank. Whoop.
You'll see I also got the light hung over the tank, the 80/20 stand worked great and looks great (but I'm biased). The only thing left to do was to break down the old tank. I did that over the course of a few days, and as no one cares about that I won't go into detail. The only point I will make, for my own records, is that I pulled all the snails/urchins out, scrubbed the worst of any algae off their shells and transferred them to a 5 gallon tank with some sand/rock from the old DT along with a heater, powerhead, etc. I put that tank in the dark and my thought process was that they would eat the algae off the rock (to stay fed) and off each other to clean up. And the dark would help kill off any remaining shell algae as well. I'm happy to report that plan seems to be working great. The snail shells are nearly all perfectly clean. The only sad part is that I lost 1 of my 3 urchins in this process. I'm positive it wasn't lack of food, so I'm assuming maybe I messed up with salinity and he couldn't handle it? Or he just didn't like the stress of the transfer? I dunno, but it made me sad to be sure.
Regardless, I was extremely happy to have the fish in the tank. And with that, I think I'll end this post.
Varig
Senior Member
BOD
Lifetime Member
Event Committee
TCMAS Member
TCMAS Supporter
Meeting Host 2022
Meeting Host 2023
Meeting Host 2024
Meeting Host 2026
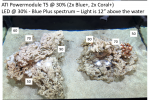
Okay, so I realize that I technically missed a big step in the last post, but I sort of did it on purpose because I wanted it to stand along (again, for my own ease of finding in the future). What step is that you might ask? Well, PAR mapping of course. I wanted to get the full tank mapped BEFORE I had fish in the tank, to avoid the situation last time of the yellow coris wrasse diving out of the tank...silly fish. Thanks to an awesome club member I was able to borrow a PAR meter and it was off to the races. I'm not going to post ALL of the mapping I did here, but suffice to say I did a LOT. I only tried 2 light heights, 10" and 12" off the water as that is what I had found with previous testing seemed to yield good spread without excessive light spill. In the end I decided to go with the 12" distance as it seemed to be a little more uniform, I could still get the desired PAR, and I figured it gave me more access for maintenance etc. without the light getting in the way. So at 12" I did several power settings on the lights to try to get a good understanding of how the PAR would change. My intention is to run with one of the actual settings I used, BUT it appears that there was a somewhat linear relationship between power level and PAR, so I'd feel pretty comfortable in the future to adjust in between the levels if I felt like I needed a little more or a little less. Anyway, on to the maps:
Lowest light settings I tried: 30% T5 power, 30% LED Power. I think this could be a good starting point to not cause huge algae blooms and it should easily keep LPS alive:


Next I bumped the power up to 50% for the T5 and the LED, and I think this will be my starting "mixed reef" setting. Again I think I'll start with the settings above, but in 6 months or whenever I feel like the rock is getting some good bacteria/isn't covered in algae, I will probably adjust to these settings over the course of a few weeks:


Then I moved them to 70% power to for what I think would be my "SPS dominated" settings:


For giggles I also tried a setting where I dropped just the right LED fixture (the Powermodule I have has 4x T5 bulbs and 2x large LED clusters) from 70% to 50%. My thought process was to see if I could turn the right rock structure into more of an LPS zone and leave the left structure as more SPS. I think it maybe helped a little versus the settings above:


I tried turning the LED down even more, but with much more of a difference than 20% it started to be pretty noticeable that one side of the tank was dimmer than the other, which I didn't like the look of. So I think 20% delta is probably all I would consider.
Finally, I don't know why I didn't do it at 12" stand off (probably a miss), but at 10" I did a "max power" test. I guess I put the LEDs at 90% (why, I don't know). But anyway, I proved to myself that I could get some pretty serious PAR for a pretty serious SPS tank IF that was ever the desire:


Overall I'm extremely happy with the results. I really liked this light over my old tank, but there is no doubt it was WAY too much light for a 36" x 12" display area. To avoid light spill I had the light only ~4" off the tank. And because of that the LEDs would just become laser beams that tended to nuke anything directly under them. As such, even though I was running the T5's at ~50% in the old tank, I had the LEDs at like 10%. So I'm super excited that by bringing the light up to the 10-12" height, it allowed those LEDs to spread like they're supposed to, helping to supplement the T5's in blanketing the tank with light. I don't know what level of PAR uniformity you guys hope for in a tank, but after watching all the BRS videos and judging by their standards (where they tried to keep LPS in a 50-150PAR range and SPS in a 150-300PAR range, I think this setup did amazing, with essentially 100% of the points I tested being in those ranges (depending on the power level).
The other thing I'll mention, which is "sort" of related to PAR because it's relative to coral, is with some inspiration from @spsick and help from @Nezw0001 I'm going to be trying a new method for my frag plugs/mounting frags in the tank. Basically I'm going to mount all my frags to a small piece of rubble (instead of a frag plug) which is glued to a 1/4" acrylic rod. I'll immediately mount the frags on that when I get them and when they go into my QT system. BUT, to help the 1/4" rod from wobbling around in the egg crate, I drew up a frag plug "fattener" and got them printed in PETG. I think they look awesome and I'm excited to try them out.


I hope the rod idea gives me the flexibility to move frags around my scape without needing to constantly re-glue them (that's the dream).
Anyway enough for that post. I think just 1 more will bring us up to today. If you've made it this far....you have issues, like me
Lowest light settings I tried: 30% T5 power, 30% LED Power. I think this could be a good starting point to not cause huge algae blooms and it should easily keep LPS alive:
Next I bumped the power up to 50% for the T5 and the LED, and I think this will be my starting "mixed reef" setting. Again I think I'll start with the settings above, but in 6 months or whenever I feel like the rock is getting some good bacteria/isn't covered in algae, I will probably adjust to these settings over the course of a few weeks:
Then I moved them to 70% power to for what I think would be my "SPS dominated" settings:
For giggles I also tried a setting where I dropped just the right LED fixture (the Powermodule I have has 4x T5 bulbs and 2x large LED clusters) from 70% to 50%. My thought process was to see if I could turn the right rock structure into more of an LPS zone and leave the left structure as more SPS. I think it maybe helped a little versus the settings above:
I tried turning the LED down even more, but with much more of a difference than 20% it started to be pretty noticeable that one side of the tank was dimmer than the other, which I didn't like the look of. So I think 20% delta is probably all I would consider.
Finally, I don't know why I didn't do it at 12" stand off (probably a miss), but at 10" I did a "max power" test. I guess I put the LEDs at 90% (why, I don't know). But anyway, I proved to myself that I could get some pretty serious PAR for a pretty serious SPS tank IF that was ever the desire:
Overall I'm extremely happy with the results. I really liked this light over my old tank, but there is no doubt it was WAY too much light for a 36" x 12" display area. To avoid light spill I had the light only ~4" off the tank. And because of that the LEDs would just become laser beams that tended to nuke anything directly under them. As such, even though I was running the T5's at ~50% in the old tank, I had the LEDs at like 10%. So I'm super excited that by bringing the light up to the 10-12" height, it allowed those LEDs to spread like they're supposed to, helping to supplement the T5's in blanketing the tank with light. I don't know what level of PAR uniformity you guys hope for in a tank, but after watching all the BRS videos and judging by their standards (where they tried to keep LPS in a 50-150PAR range and SPS in a 150-300PAR range, I think this setup did amazing, with essentially 100% of the points I tested being in those ranges (depending on the power level).
The other thing I'll mention, which is "sort" of related to PAR because it's relative to coral, is with some inspiration from @spsick and help from @Nezw0001 I'm going to be trying a new method for my frag plugs/mounting frags in the tank. Basically I'm going to mount all my frags to a small piece of rubble (instead of a frag plug) which is glued to a 1/4" acrylic rod. I'll immediately mount the frags on that when I get them and when they go into my QT system. BUT, to help the 1/4" rod from wobbling around in the egg crate, I drew up a frag plug "fattener" and got them printed in PETG. I think they look awesome and I'm excited to try them out.
I hope the rod idea gives me the flexibility to move frags around my scape without needing to constantly re-glue them (that's the dream).
Anyway enough for that post. I think just 1 more will bring us up to today. If you've made it this far....you have issues, like me
Attachments
Varig
Senior Member
BOD
Lifetime Member
Event Committee
TCMAS Member
TCMAS Supporter
Meeting Host 2022
Meeting Host 2023
Meeting Host 2024
Meeting Host 2026
Okay, post number 3/3 for the day. I don't know how the forum works, if I post 3 back to back will it send you to the most recent one or the last one you've seen? If this is the first thing you're seeing, feel free to flip back two posts if you want to see the tank filling and PAR mapping extravaganza. If not, then fine, don't!
All that's really left to discuss at present is the slow but steady progress of getting all the remaining equipment transferred over from the old tank, most specifically the GHL controller. I got all the equipment cleaned up and then have been doing a LOT of thinking about where to mount it. Ideally I didn't want to put it in the stand, just to try to reduce clutter AND to avoid electronics in the same space as the humid sump. I have some tall cupboards to the left of my tank, but there is a ~2ft gap and getting all the wires/dosing lines over there without being super ugly seemed like a pain in the but. And some of the cords (like my skimmer pump) were too short, so I'd need to wire up extension cords. It didn't seem like a great fit. THEN I started eyeing the cabinet that sits under the built in bench right next to the tank:

It's not hugely convenient because it's so low, BUT most of the stuff I was going to be putting in there (power strips, controller, etc.) don't need a lot of maintenance. So I figured I'd give it a try. And so far I'm really happy with how it's turning out:

I need to get more light down there (and clean up wires), but I think it's going to be great. It keeps all the electronics away from the sump, creates almost a guaranteed drip loop, and I "think" it's going to be close enough that all the cords will reach. The only thing I don't love about it is again, it's super low AND if I put a second dosing pump in there, it might be a pain to keep dosing containers in there (since it's not that large). I'm already thinking about how I'll dose my kalkwasser. I think the container will need to be under the stand, with the line running all the way into the cabinet and back out to the tank. In total that will only be ~6-8 feet of dosing line, nearly horizontal, being dosed with the GHL Doser. GHL claims it can pump 50 feet, so I'm sure this will be fine.
What are the next steps you might ask? Well I'll tell you.
1) Hookup power to the GHL PowerBar instead of the temporary power strip
2) Install GHL Versia Stream pumps (flow pumps) in the display to go with the IceCap Gyre 2k
3) Setup Plank Autofeeder
4) Setup kalkwasser dosing
5) Add coral
I have a few additional things I'm debating about when/how to do on the tank. For example, I have a CO2 scrubber and intended to set it up as a recirculating scrubber. I'm not sure how early to put that online (if at all). I bought an Ozotech 200 ozone generator. I know I didn't need it straight away, but now that I have it I'm planning to set that up. I think I'll start with the ~1 hour each night on the lowest setting plan and see what happens. I also haven't turned on the UV yet. I figured all my fish are QT'ed and there aren't any lights on, so I don't need it for algae control. SO I would leave it off to let the pods/bacteria have free reign in the water. But at some point I will need to get it turned on. Technically I haven't turned on the skimmer either. I had been dosing so much bacteria in those early days that I left it off. And with just 6 small fish in the system I don't think my bioload is crazy. Test parameters have stayed pretty stable, so I was worried about stripping TOO much out of the water. That being said, it's probably time to turn it on.
Speaking of nutrient control, I did start the ATS right away and after ~1.5 weeks I got my first brown crap growing on the screen. So there is something happening in there:

Let's see how fast it turns into something that looks like actual algae. @jlanger had a great idea at my meeting, I could seed my screen with some of his turf algae. I may still take you up on that, but for now I'm curious to see how it goes by trying to get established itself.
Finally, if you've made it this long, you deserve some sweet (in my opinion) coral pictures. As I mentioned, everything is just chilling in my frag/coral QT tank, but during my meeting several people were trying to convince me to just get the coral in the new DT. The bacteria on the coral will help the new tank more than low levels of light will hurt it (so they say). I'm VERY close to giving in to this pressure.
First, my bizzaro cyphastrea. I'm not sure what's up with this coral, because I swear it used to be a full blue background with the orange polyps. But now there is a cool neon green coming out in the area between the polyps. I hope it's not a bad sign, because I like it.

Next a couple shots of my fuzzy green pssamacora and the edge of a plating monti and a orange setosa. The Setosa was not super happy with the extreme algae levels in the old DT and seems much happier in the QT tank. Let's hope it stays happy in the new DT as well.

And finally just an assortment of some of my other corals. A rainbow digi (that never really shows rainbow colors for me), a green digi, a rainbow acan, the cyphastrea again and probalby my favorite coral, the fungia. I guess I maybe should have centered that instead of cutting it off.... I love that coral. I thought I had killed it at first, but I've been feeding it mysis 2-3 times per week and it has plumped up and seems super happy. Fingers crossed, because I think fungia are some of the coolest. If I can keep this one alive I will definitely have my eyes on more in the future.

Oh, and I guess I should also mention that I got some new fish ordered from Reef Collective. I'm going to have them QT them for me again, so I'm not exactly sure when they will come. But I'm excited to get some new/different fish to add in with my existing crew. Updates on those once they arrive.
Okay, for real that's enough. I sat here way too long typing this...hopefully someone will find something interesting from my blah blah. But as was discussed in my last build thread, if nothing else it's great for me to be able to look back and see where I came from.
As @Reefer Oz would say, keep reefing hard......nerds (last part was me )
)
Cheers!
David
All that's really left to discuss at present is the slow but steady progress of getting all the remaining equipment transferred over from the old tank, most specifically the GHL controller. I got all the equipment cleaned up and then have been doing a LOT of thinking about where to mount it. Ideally I didn't want to put it in the stand, just to try to reduce clutter AND to avoid electronics in the same space as the humid sump. I have some tall cupboards to the left of my tank, but there is a ~2ft gap and getting all the wires/dosing lines over there without being super ugly seemed like a pain in the but. And some of the cords (like my skimmer pump) were too short, so I'd need to wire up extension cords. It didn't seem like a great fit. THEN I started eyeing the cabinet that sits under the built in bench right next to the tank:
It's not hugely convenient because it's so low, BUT most of the stuff I was going to be putting in there (power strips, controller, etc.) don't need a lot of maintenance. So I figured I'd give it a try. And so far I'm really happy with how it's turning out:
I need to get more light down there (and clean up wires), but I think it's going to be great. It keeps all the electronics away from the sump, creates almost a guaranteed drip loop, and I "think" it's going to be close enough that all the cords will reach. The only thing I don't love about it is again, it's super low AND if I put a second dosing pump in there, it might be a pain to keep dosing containers in there (since it's not that large). I'm already thinking about how I'll dose my kalkwasser. I think the container will need to be under the stand, with the line running all the way into the cabinet and back out to the tank. In total that will only be ~6-8 feet of dosing line, nearly horizontal, being dosed with the GHL Doser. GHL claims it can pump 50 feet, so I'm sure this will be fine.
What are the next steps you might ask? Well I'll tell you.
1) Hookup power to the GHL PowerBar instead of the temporary power strip
2) Install GHL Versia Stream pumps (flow pumps) in the display to go with the IceCap Gyre 2k
3) Setup Plank Autofeeder
4) Setup kalkwasser dosing
5) Add coral
I have a few additional things I'm debating about when/how to do on the tank. For example, I have a CO2 scrubber and intended to set it up as a recirculating scrubber. I'm not sure how early to put that online (if at all). I bought an Ozotech 200 ozone generator. I know I didn't need it straight away, but now that I have it I'm planning to set that up. I think I'll start with the ~1 hour each night on the lowest setting plan and see what happens. I also haven't turned on the UV yet. I figured all my fish are QT'ed and there aren't any lights on, so I don't need it for algae control. SO I would leave it off to let the pods/bacteria have free reign in the water. But at some point I will need to get it turned on. Technically I haven't turned on the skimmer either. I had been dosing so much bacteria in those early days that I left it off. And with just 6 small fish in the system I don't think my bioload is crazy. Test parameters have stayed pretty stable, so I was worried about stripping TOO much out of the water. That being said, it's probably time to turn it on.
Speaking of nutrient control, I did start the ATS right away and after ~1.5 weeks I got my first brown crap growing on the screen. So there is something happening in there:
Let's see how fast it turns into something that looks like actual algae. @jlanger had a great idea at my meeting, I could seed my screen with some of his turf algae. I may still take you up on that, but for now I'm curious to see how it goes by trying to get established itself.
Finally, if you've made it this long, you deserve some sweet (in my opinion) coral pictures. As I mentioned, everything is just chilling in my frag/coral QT tank, but during my meeting several people were trying to convince me to just get the coral in the new DT. The bacteria on the coral will help the new tank more than low levels of light will hurt it (so they say). I'm VERY close to giving in to this pressure.
First, my bizzaro cyphastrea. I'm not sure what's up with this coral, because I swear it used to be a full blue background with the orange polyps. But now there is a cool neon green coming out in the area between the polyps. I hope it's not a bad sign, because I like it.
Next a couple shots of my fuzzy green pssamacora and the edge of a plating monti and a orange setosa. The Setosa was not super happy with the extreme algae levels in the old DT and seems much happier in the QT tank. Let's hope it stays happy in the new DT as well.
And finally just an assortment of some of my other corals. A rainbow digi (that never really shows rainbow colors for me), a green digi, a rainbow acan, the cyphastrea again and probalby my favorite coral, the fungia. I guess I maybe should have centered that instead of cutting it off.... I love that coral. I thought I had killed it at first, but I've been feeding it mysis 2-3 times per week and it has plumped up and seems super happy. Fingers crossed, because I think fungia are some of the coolest. If I can keep this one alive I will definitely have my eyes on more in the future.
Oh, and I guess I should also mention that I got some new fish ordered from Reef Collective. I'm going to have them QT them for me again, so I'm not exactly sure when they will come. But I'm excited to get some new/different fish to add in with my existing crew. Updates on those once they arrive.
Okay, for real that's enough. I sat here way too long typing this...hopefully someone will find something interesting from my blah blah. But as was discussed in my last build thread, if nothing else it's great for me to be able to look back and see where I came from.
As @Reefer Oz would say, keep reefing hard......nerds (last part was me
)Cheers!
David
Awesome update! Everything looks great!
I’m bummed I was out of town during your meeting - looking forward to your next one.
I’m bummed I was out of town during your meeting - looking forward to your next one.

I love this idea for plugs!The other thing I'll mention, which is "sort" of related to PAR because it's relative to coral, is with some inspiration from @spsick and help from @Nezw0001 I'm going to be trying a new method for my frag plugs/mounting frags in the tank. Basically I'm going to mount all my frags to a small piece of rubble (instead of a frag plug) which is glued to a 1/4" acrylic rod. I'll immediately mount the frags on that when I get them and when they go into my QT system. BUT, to help the 1/4" rod from wobbling around in the egg crate, I drew up a frag plug "fattener" and got them printed in PETG. I think they look awesome and I'm excited to try them out.
View attachment 65089View attachment 65090View attachment 65091
I hope the rod idea gives me the flexibility to move frags around my scape without needing to constantly re-glue them (that's the dream).
Anyway enough for that post. I think just 1 more will bring us up to today. If you've made it this far....you have issues, like me
Varig
Senior Member
BOD
Lifetime Member
Event Committee
TCMAS Member
TCMAS Supporter
Meeting Host 2022
Meeting Host 2023
Meeting Host 2024
Meeting Host 2026
Things are still trucking along. I spent a little time cleaning up cables (e.g. making custom length cat6 cables for connecting between my ghl devices). My goal for Xmas break is to get the second ghl powerbar installed so everything will be “permanent”. And ideally to get the Plank feeder setup.
In terms of updates, there is more algae growing in the ATS. I cleaned it once and spread some of the algae around into the slime areas to try to kick start those areas on the screen. When I put it back in lots of little bits got washed off the screen and up into the display. Doh! I used a net and got most of it, but that was a whoops. So I then got a pro tip from @jlanger, namely to put a filter sock on the outlet of the ATS to prevent this in the future. It sounds like it’s more of a problem in these initial stages and shouldn’t be a big deal once it’s fully seeded with filament algae. But let’s see.
I see a haze of green forming on all the highest lit areas (only 80-100par with these light settings, but the highest of the light I have currently). I don’t think it’s young hair algae, maybe diatoms. I’ll keep an eye on it. I assume it’s just the uglies. But if it persists too long I’ll be quicker to check for Dino’s this time.
For Xmas I took a quick video of my current favorite coral, the fungia.
And I did a quick full tank sweep.
I’m keeping an eye on my lobo. It’s seemed really happy in the new tank for the first couple weeks, but I noticed yesterday that it wasn’t quite as full/puffy as it’s been previously. It appears to be in the middle of splitting, so maybe it’s just spending energy on that. Or maybe it’s digesting from a recent feeding. OR maybe it actually isn’t happy with that spot. Time shall tell.
Anyway, Merry Christmas all!
David
Varig
Senior Member
BOD
Lifetime Member
Event Committee
TCMAS Member
TCMAS Supporter
Meeting Host 2022
Meeting Host 2023
Meeting Host 2024
Meeting Host 2026
I rammed together a small recirculating co2 scrubber for my coral QT tank last night.

PH has been pretty low in there, so going to see if this helps at all. I didn’t have much for a nano skimmer, so I don’t know how much air is actually getting processed. I don’t actually want to skim anything with no fish in that tank, so I’m debating about drilling a hole in the collection cup so any skim just goes back into the tank.
I also ordered a co2 monitor that’s supposed to arrive today. Very interested to see what the levels are down there.
Beyond that, not much happening. Just enjoying spending time looking at the new tank. As mentioned previously there is definitely a green haze on the rocks that doesn’t scrub off easily with a toothbrush. Ugly phase here we come.
I rammed together a small recirculating co2 scrubber for my coral QT tank last night.
View attachment 65299
PH has been pretty low in there, so going to see if this helps at all. I didn’t have much for a nano skimmer, so I don’t know how much air is actually getting processed. I don’t actually want to skim anything with no fish in that tank, so I’m debating about drilling a hole in the collection cup so any skim just goes back into the tank.
I also ordered a co2 monitor that’s supposed to arrive today. Very interested to see what the levels are down there.
Beyond that, not much happening. Just enjoying spending time looking at the new tank. As mentioned previously there is definitely a green haze on the rocks that doesn’t scrub off easily with a toothbrush. Ugly phase here we come.
I was thinking about this with my frag tank before I replaced the pH probe and found it was ok. I wonder if you could just put your scrubber inline with an air pump and stone and get the same effect? Obviously you could not recirculate in that scenario.
Also, green algae on the rocks is good! You’re moving along. Just make sure you’ve got enough snails and they’ll keep it under control.
Varig
Senior Member
BOD
Lifetime Member
Event Committee
TCMAS Member
TCMAS Supporter
Meeting Host 2022
Meeting Host 2023
Meeting Host 2024
Meeting Host 2026
So it’s funny you mention that. The first thing I tried was actually putting an air stone in the tank just to see if that extra aeration would change the pH at all since I don’t normally run a skimmer on that tank. Running the air stone by itself didn’t appear to have any impact. So then I did think about doing exactly what you mentioned, but I thought I would try this recirculating set up first to see if it would work. But to your point if it either isn’t enough airflow or doesn’t work correctly, that would be a good next step to try. I’ve got all the stuff it’s just a matter of redoing the hoses. Great minds and all that.
Regarding the DT tank and cleanup crew, I have two urchins and several snails in there. I’m gonna transfer more over from my quarantine tank and get more from Reef collective today to start quarantining the next batch. Hopefully it’s enough to stay ahead. And hopefully when the new fish come in a couple of weeks, they’ll also help.
Regarding the DT tank and cleanup crew, I have two urchins and several snails in there. I’m gonna transfer more over from my quarantine tank and get more from Reef collective today to start quarantining the next batch. Hopefully it’s enough to stay ahead. And hopefully when the new fish come in a couple of weeks, they’ll also help.
Users who are viewing this thread
Total: 2 (members: 0, guests: 2)