Good to know. Thinking of getting one myself. Do you use their “jerky” food?
Navigation
Install the app
How to install the app on iOS
Follow along with the video below to see how to install our site as a web app on your home screen.

Note: This feature currently requires accessing the site using the built-in Safari browser.
More options
-
TCMAS Spring Saltwater Expo 2026
The pre-sale forum is open for the spring expo!First, read the pre-sale rules!Then head to the pre-sale forum

You are using an out of date browser. It may not display this or other websites correctly.
You should upgrade or use an alternative browser.
You should upgrade or use an alternative browser.
Durand tank build (1 Viewer)
- Thread starter reef junkie
- Start date
OP
OP
reef junkie
Senior Member
Yes i use their jerky food. I like it or the fish do LOL. They have good info on how much to feed in the directions online that I found recently. Think its 3 min of run time equals 1 frozen cube.Good to know. Thinking of getting one myself. Do you use their “jerky” food?
OP
OP
reef junkie
Senior Member
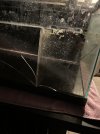
Sat on the couch yesterday evening about 4pm to visit with family that was staying with us and we all heard a crack sound from the tank. After a few min of searching around the tank and the basement under the tank I looked in the sump and saw water starting to accumulate in the bottom of the stand. After a brief second realized the 40 gallon sump hand cracked. Looks like it started at the return chamber baffle and went up from there. Only took 15 min to get the sump water sucked out, the equipment pulled, frags placed into the main and the tank pulled. Then hit the internet to see what I could find quickly. Found a trigger system close to the same footprint on market place. By 8pm sump was placing inside the sump and started adding the equipment back in. I need to mix up saltwater and hope to be back up and running by 12. I would be sooner but we have house guest sleeping in the basement right next to utility room where I make all my saltwater.
I dont know if my baffle was in to tight or if the trash can that was maybe a little to large for the space added some sort of stress to the tank, but either way with some fast acting, and the fact the bottom of the stand is sealed and made to hold water. No damage, no wet floors, and for now to loss of livestock.

Once im back up and running Ill get some pictures posted.
I dont know if my baffle was in to tight or if the trash can that was maybe a little to large for the space added some sort of stress to the tank, but either way with some fast acting, and the fact the bottom of the stand is sealed and made to hold water. No damage, no wet floors, and for now to loss of livestock.
Once im back up and running Ill get some pictures posted.
BlindSwordsman
Hiệp Sĩ Mù Nghe Gió Kiếm
Lifetime Member
TCMAS Member
Meeting Host 2022
Meeting Host 2023
Meeting Host 2024
Meeting Host 2025
Sorry to hear about your sump issue. At least you caught it immediately right on time and there was no water damage, I guess  .
.
When I bought the baffles online and did the sump myself the first time. I made the same mistake myself. The baffles were a snug fit to the tank. It looked perfect when it was dry. But after adding water, when it was in use, I think the baffles expanded, and it cracked the tank. For any sump installation after that, I would make sure to grind down the width of the baffles a bit in account for some expansion.
. When I bought the baffles online and did the sump myself the first time. I made the same mistake myself. The baffles were a snug fit to the tank. It looked perfect when it was dry. But after adding water, when it was in use, I think the baffles expanded, and it cracked the tank. For any sump installation after that, I would make sure to grind down the width of the baffles a bit in account for some expansion.
OP
OP
reef junkie
Senior Member
Thanks. Yea super happy we were home. If it was the baffles that caused this I’m a little surprised it took as long as it did.Sorry to hear about your sump issue. At least you caught it immediately right on time and there was no water damage, I guess
When I bought the baffles online and did the sump myself the first time. I made the same mistake myself. The baffles were a snug fit to the tank. It looked perfect when it was dry. But after adding water, when it was in use, I think the baffles expanded, and it cracked the tank. For any sump installation after that, I would make sure to grind down the width of the baffles a bit in account for some expansion.
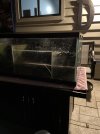
Here is the tank as it sits outside awaiting the trash man. Lol.
Attachments
Thanks. Yea super happy we were home. If it was the baffles that caused this I’m a little surprised it took as long as it did.
Here is the tank as it sits outside awaiting the trash man. Lol.
Wild I’ve never seen such a thing!
Varig
Senior Member
BOD
Lifetime Member
Event Committee
TCMAS Member
TCMAS Supporter
Meeting Host 2022
Meeting Host 2023
Meeting Host 2024
Meeting Host 2026
Looks repairable. Grab some flex seal ")
Obviously easy to make light of an extremely stressful situation now that you have it rectified. Glad you got it resolved so quickly. Impressive. And glad to hear the livestock weren’t impacted.
Obviously easy to make light of an extremely stressful situation now that you have it rectified. Glad you got it resolved so quickly. Impressive. And glad to hear the livestock weren’t impacted.
Very fortunate that you heard it, and talk about a quick turnaround to already have another sump!
If it were me I’m still mixing that saltwater even with the guests
If it were me I’m still mixing that saltwater even with the guests
OP
OP
reef junkie
Senior Member
Thanks everyone. I’m glad it all worked out. There were many flex seal jokes during this. Lol.
I also considered mixing salt when parents were sleeping in the basment. Lol. But by stoping and waiting till morning it allowed me to do what I wanted and not rush things.
Here is the final results. I’ll need to add a small pump to the return chamber and the water is much more still on the sump. I will also be looking for some shorter heaters. The ones I have now are little to long to lay flat on the bottom of the tank. Plus I’m so for new heaters anyways. Plan is to let it ride until Friday am and then I’ll test and see how things are coming in at and then I can adjust doses.

Solo cup is collecting the first little bits of kalk since I disturbed the reactor I don’t want flakes falling into the tank.
I also considered mixing salt when parents were sleeping in the basment. Lol. But by stoping and waiting till morning it allowed me to do what I wanted and not rush things.
Here is the final results. I’ll need to add a small pump to the return chamber and the water is much more still on the sump. I will also be looking for some shorter heaters. The ones I have now are little to long to lay flat on the bottom of the tank. Plus I’m so for new heaters anyways. Plan is to let it ride until Friday am and then I’ll test and see how things are coming in at and then I can adjust doses.
Solo cup is collecting the first little bits of kalk since I disturbed the reactor I don’t want flakes falling into the tank.
Super clean and organized! Like it was meant to be!
OP
OP
reef junkie
Senior Member
Thanks Ben.
All that work and it all looks the same to me. Lol. I did gain a little extra room though so hopefully it will be easier finding a larger ato container. I put the glass one back in since it fits and looks good. But I’m going to get sick of filling every few days quick.
All that work and it all looks the same to me. Lol. I did gain a little extra room though so hopefully it will be easier finding a larger ato container. I put the glass one back in since it fits and looks good. But I’m going to get sick of filling every few days quick.
Varig
Senior Member
BOD
Lifetime Member
Event Committee
TCMAS Member
TCMAS Supporter
Meeting Host 2022
Meeting Host 2023
Meeting Host 2024
Meeting Host 2026
Indeed, that is super clean, nice work. I really need to get my autofeeder setup....this is a helpful and necessary reminder.
Did you have glass or acrylic baffles in the sump that cracked? Hard to tell from the photos but amazed you found and swapped a replacement in that short a time without issues. Looks like you had it planned that way all along!
OP
OP
reef junkie
Senior Member
I could not get the auto feeder to mount where i wanted with out being in the way. I drilled a hole in one of the grooves the cord runs through so when the mount sits on the rim I was able to attach the base to the back wall of the stand and hold it all in place. THe only problem I see if being able to remove the pump from the tube for cleaning But will just take the screw out to be able to remove the base to get access.Indeed, that is super clean, nice work. I really need to get my autofeeder setup....this is a helpful and necessary reminder.
The baffles were thin acrylic pick up from Menards. They bowed a little from being thin. I did not want to use the same baffles again when this all happened so going glass tank again and thicker baffles was going to take longer then I wanted.So after searching facebook I got lucky I found 2 that would work for what I wanted. I did have to drill the intake holes on the sump to The 2 drain holes to drop inside the sump which then eliminated the use of the filter socks but I dont use them anyways so that did not mater to me. I did when I built this tank want to be able to remove the sump and tank for any reason relatively easily. I know this tank being its age wont stay in use for to many years so planning for the future as best as I could was important. Other then needing to cut the 2 drain lines to remove the old sump. The rest was pretty easy. I had unions on had just in case as well.Did you have glass or acrylic baffles in the sump that cracked? Hard to tell from the photos but amazed you found and swapped a replacement in that short a time without issues. Looks like you had it planned that way all along!
OP
OP
reef junkie
Senior Member
Got to go down this rabbit hole on Ph today and made david(@Varig) join me LOL
My ph just wont get to or over 8. With dosing kalk as much as im able. 2500ml per day spread out over 24 doses per day. As well as 2 co2 canister set up recirculating on skimmer.
This morning I removed the 2 scrubbers and put skimmer back on as it was from factory. I put my ph probe in the Kalk stirrer and it came back at 12.1 in just a min or so. Guessing that means full saturation in the stirrer.
Im sort of done trying to get over 8. Currently at 7.74. Ive done a few thing in the sump to create some flow on the surface. Might help. This time yesterday I was at 7.72 and currently at 7.74.
Got to go down this rabbit hole on Ph today and made david(@Varig) join me LOL
My ph just wont get to or over 8. With dosing kalk as much as im able. 2500ml per day spread out over 24 doses per day. As well as 2 co2 canister set up recirculating on skimmer.
This morning I removed the 2 scrubbers and put skimmer back on as it was from factory. I put my ph probe in the Kalk stirrer and it came back at 12.1 in just a min or so. Guessing that means full saturation in the stirrer.
Im sort of done trying to get over 8. Currently at 7.74. Ive done a few thing in the sump to create some flow on the surface. Might help. This time yesterday I was at 7.72 and currently at 7.74.
It’s so bananas. Have you tried aerating a sample of water inside vs outside? I guess that’s how you definitively know.
OP
OP
reef junkie
Senior Member
I dont have any parts around to try this so didnt even consider. Just a airstone and air pump is all that is needed right? Got a buddy raising angels maybe hes got something I can barrow.
Yep exactly. Get yourself one of those Penn Plax battery backup ones. Comes with the airstone and everything. They’re like 10 bucks and then you have it in case of an emergency!I dont have any parts around to try this so didnt even consider. Just a airstone and air pump is all that is needed right? Got a buddy raising angels maybe hes got something I can barrow.
I think you just aerate for 30 min outside then check ph, and do the same inside and repeat. I’m just convinced your oh is way better with a recirc scrubber and all that Kalk.
That being said I gotta respect you just saying eff it if you’re able to ignore the ph!
OP
OP
reef junkie
Senior Member
Going out to some lfs today. Who know what I’ll find lol. But gonna try and grab the things needed to do the aeration test. I’m also thinking once I have this info what can I do about it.
I did add the scrubber back on. Ph was 7.4 this am and I don’t think I’ve been that low in awhile so must be doing something. I’m seeing more or larger bubbles from skimmer now also so not sure what that is about
Still tweaking new sump a little. Water was getting oily on top so I lowered the water level on the return side and this de the water trickle more into over flow area before return causing that oily stuff to move quicker across the top of the water. I also raised the skimmer so the exhausts water from skimmer pipe creates water tension in the first chamber and last I added a power head in return section to keep the water stored up on top and below to also mix up any food that may settle.
OP
OP
reef junkie
Senior Member
Morning coffee view this am

Users who are viewing this thread
Total: 2 (members: 0, guests: 2)