Navigation
Install the app
How to install the app on iOS
Follow along with the video below to see how to install our site as a web app on your home screen.

Note: This feature currently requires accessing the site using the built-in Safari browser.
More options

You are using an out of date browser. It may not display this or other websites correctly.
You should upgrade or use an alternative browser.
You should upgrade or use an alternative browser.
Chris' Reef Savvy Shallow (1 Viewer)
- Thread starter ChristopherKriens
- Start date
-
- Tags
- acropora frag reef savvy shallow
OP
OP
The crate looks empty!
Had to confirm it wasn't empty
")
Everything had to be shipped together as the dimensions of the tank itself provide too much of an incentive for things to be stacked on top of it. The crate job and packing is really impressive.

Needs to be more unpacked!
Sent from my iPhone using Tapatalk
Sent from my iPhone using Tapatalk
OP
OP
Wow, really should have gotten the low iron glass option... it's all green!
I know, I'm glad it's only ½", otherwise I wouldn't be able to see through it at all.
Needs to be more unpacked!
Working on it!
jlanger
@thatfishcookieguy
Lifetime Member
Event Committee
Meeting Host 2020
Meeting Host 2021
Meeting Host 2022
:greenguy: Oh, boy! :greenguy:
Before I would go any further unpacking your Ark of the Covenant, I would make sure Eva is well locked up. It seems like dogs like to jump up on new things to check them out; especially a certain German Shepherd I know.
Before I would go any further unpacking your Ark of the Covenant, I would make sure Eva is well locked up. It seems like dogs like to jump up on new things to check them out; especially a certain German Shepherd I know.
Last edited:
Have you made plans about what you're going to use for flow in the display?
OP
OP
Well, it's inside. It took three of us and some "engineering." The stand actually didn't fit through the garage side door or back house door, but the front was a couple of inches wider so we got to take the scenic route. There's no way this tank is going back up those stairs without glass suction cup handles; it's fairly heavy for a 90 and it's just an awkward shape to carry.
I'll get some photos tomorrow for a little tank tour.
I'll get some photos tomorrow for a little tank tour.
Last edited:
OP
OP
Have you made plans about what you're going to use for flow in the display?
I'm hoping I can accomplish all of the flow required with power heads mounted on the back wall. I'm going to start with a MaxSpect Gyre 150 since I have an unused one, but if it's not ideal I may get a pair of MP-40 QDs.
OP
OP
It's been a long time in the works; I made a quote submission for this aquarium 560 days ago. It was forgotten about, delayed, and the stand was scrapped and restarted. But it's finally here. On with the tour:
The build quality of the aquarium is excellent, on par with ELOS which sets a pretty high standard in my opinion. The stand itself is better in every way. I believe the position in the room will end up being neither of my two options from earlier, but what Jason had suggested. For now, it's been placed away from the wall so that I have room to work through the plumbing.
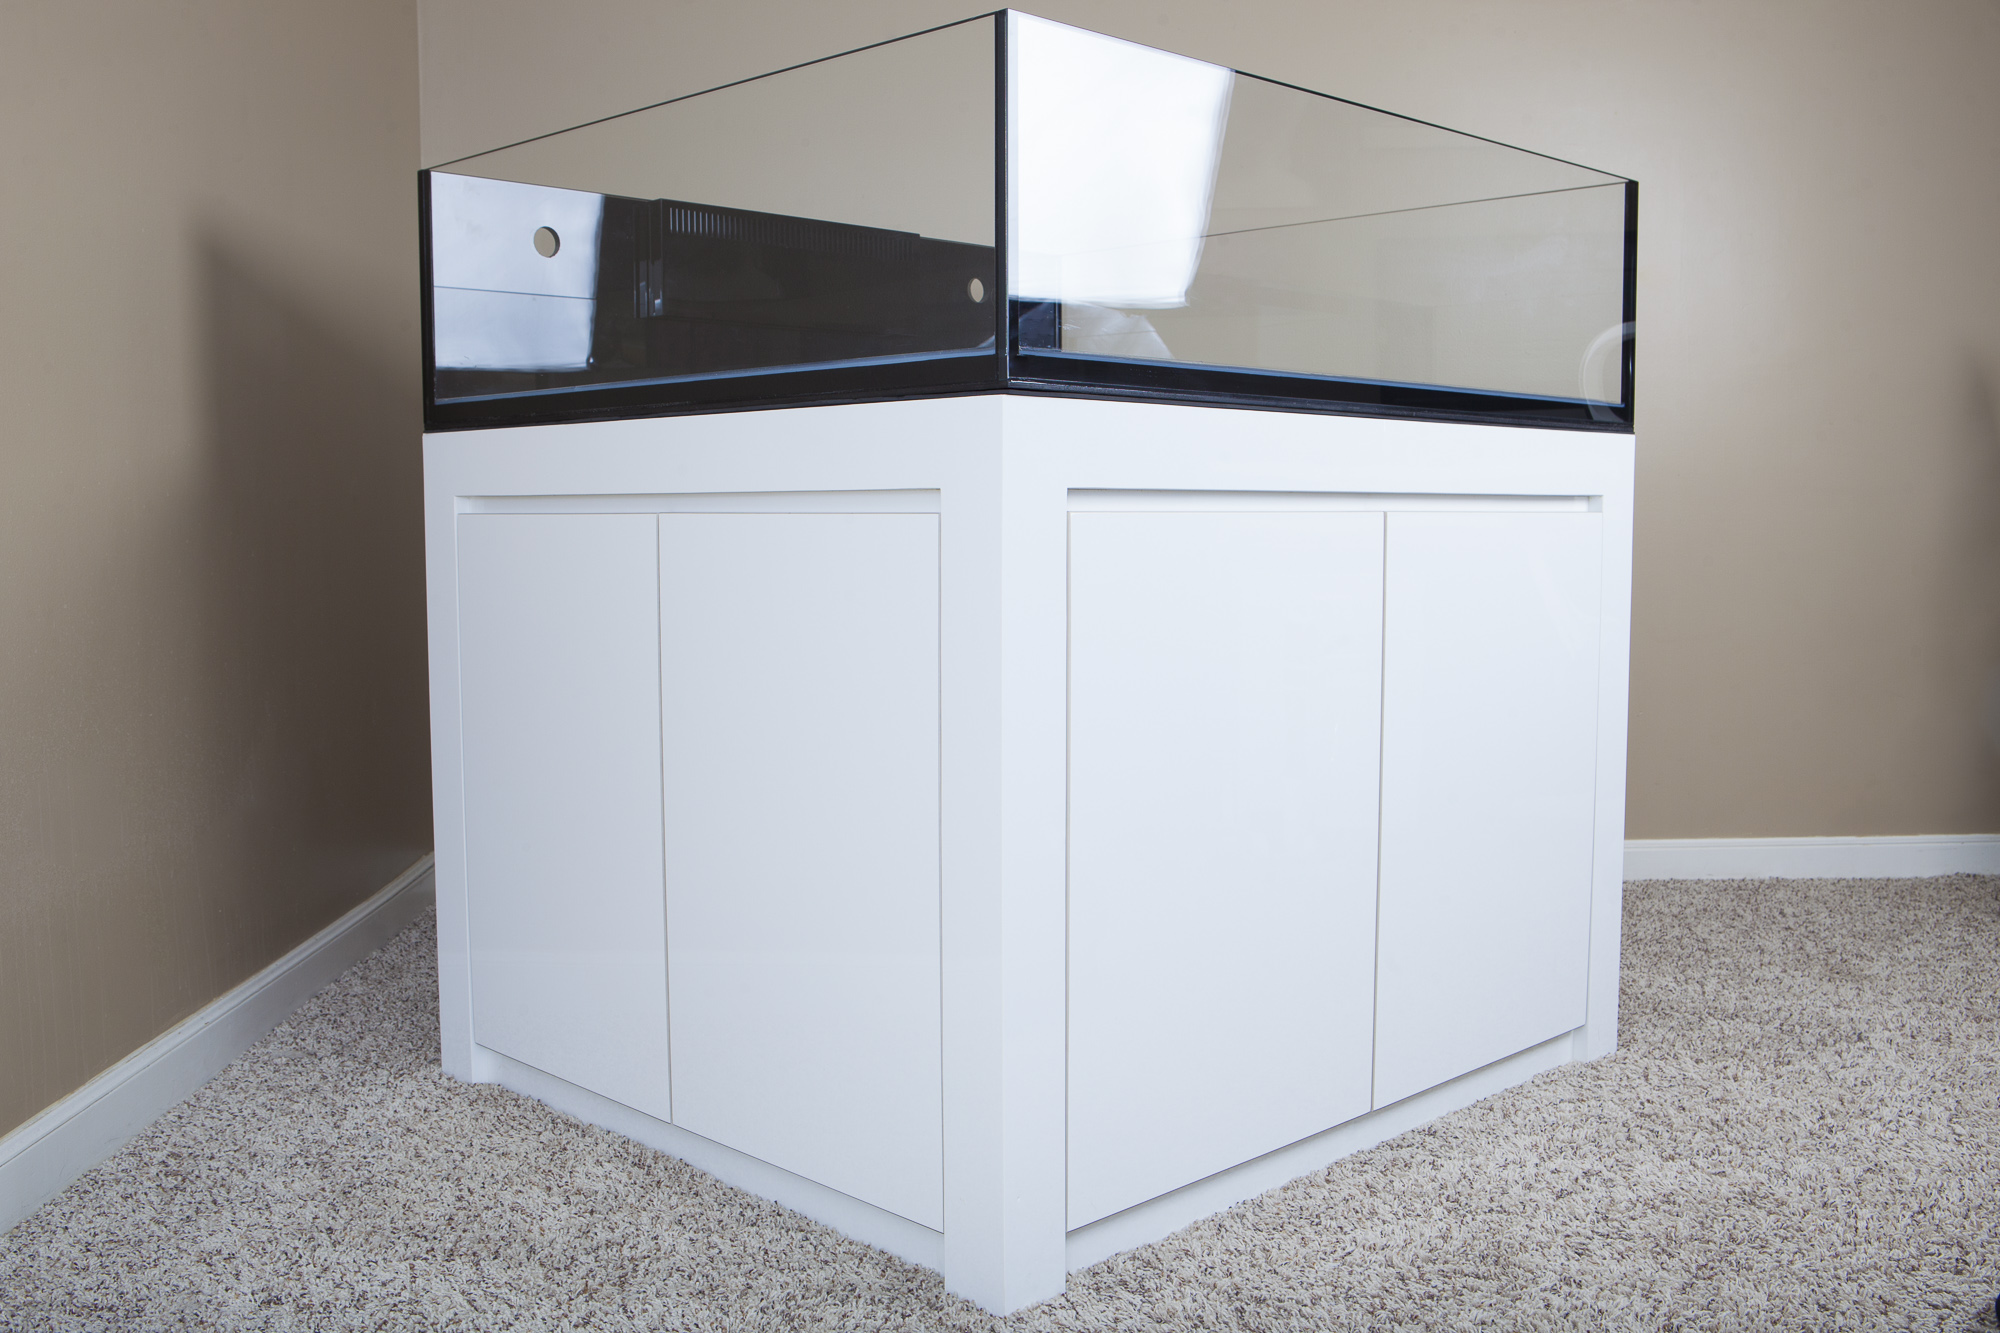
Access is going to be very good, but given the dimensions it has to be. Originally I had planned on having two sets of doors but Felix at Reef Savvy suggested that we do all three sides in case it didn't end up as a corner tank. I'm glad he did. All of the outside surfaces are high gloss white, and the inside is a matte white on the bottom and side walls. The rear of the stand is unpainted and has a 16"x20" opening to route the plumbing from the overflow. My initial thought was to place the sump against the rear wall since that's the shortest route to the overflow, but I'm considering putting it up against one of the doorways for easier maintenance. There is going to be a good deal of unused room under the stand, so I'm considering another little system for the purposes of coral quarantine underneath.
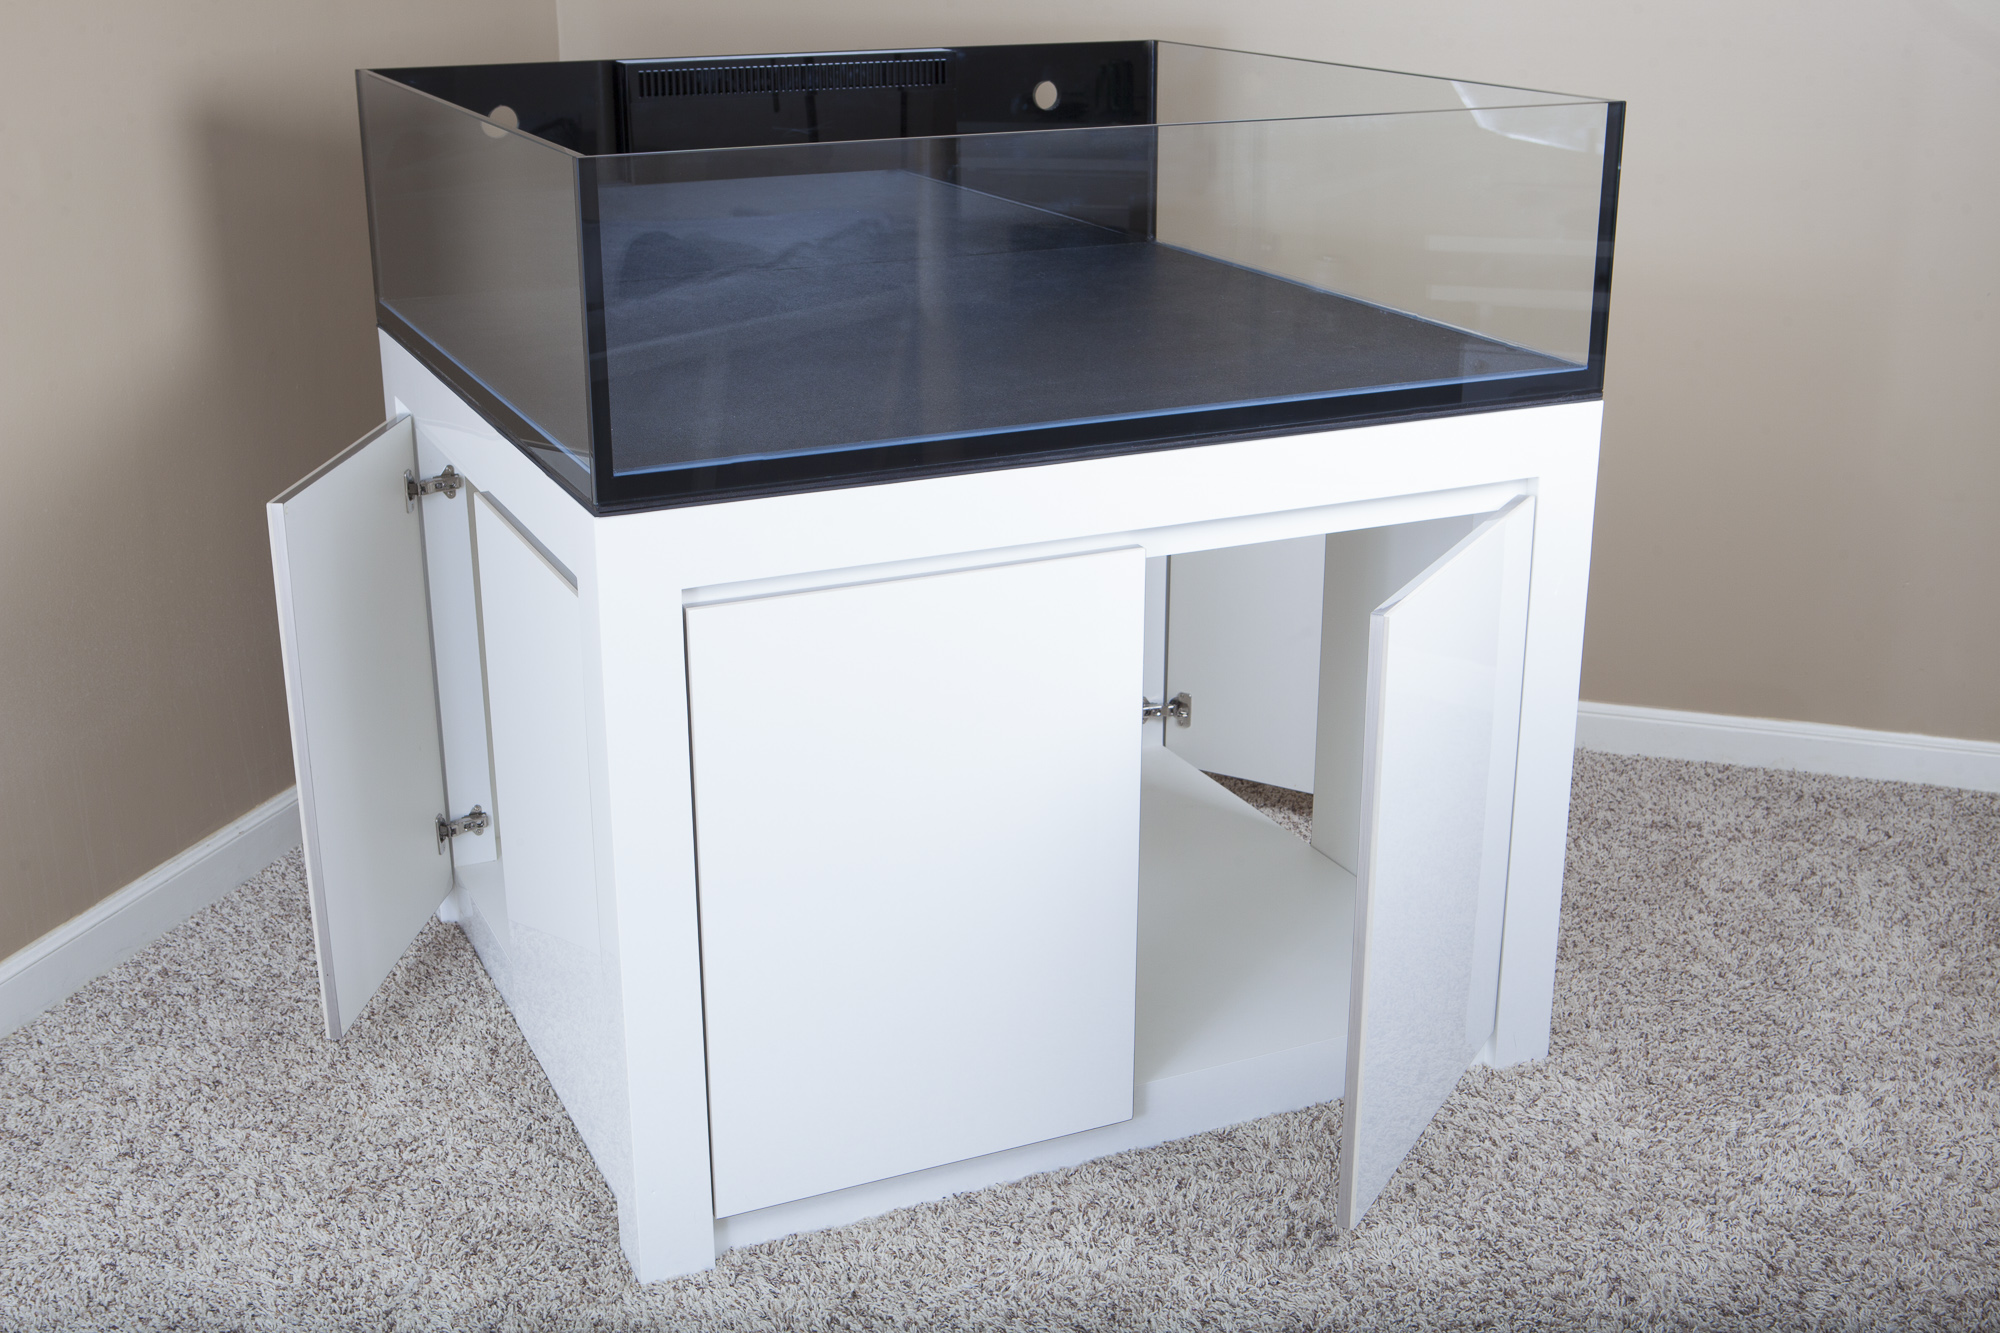
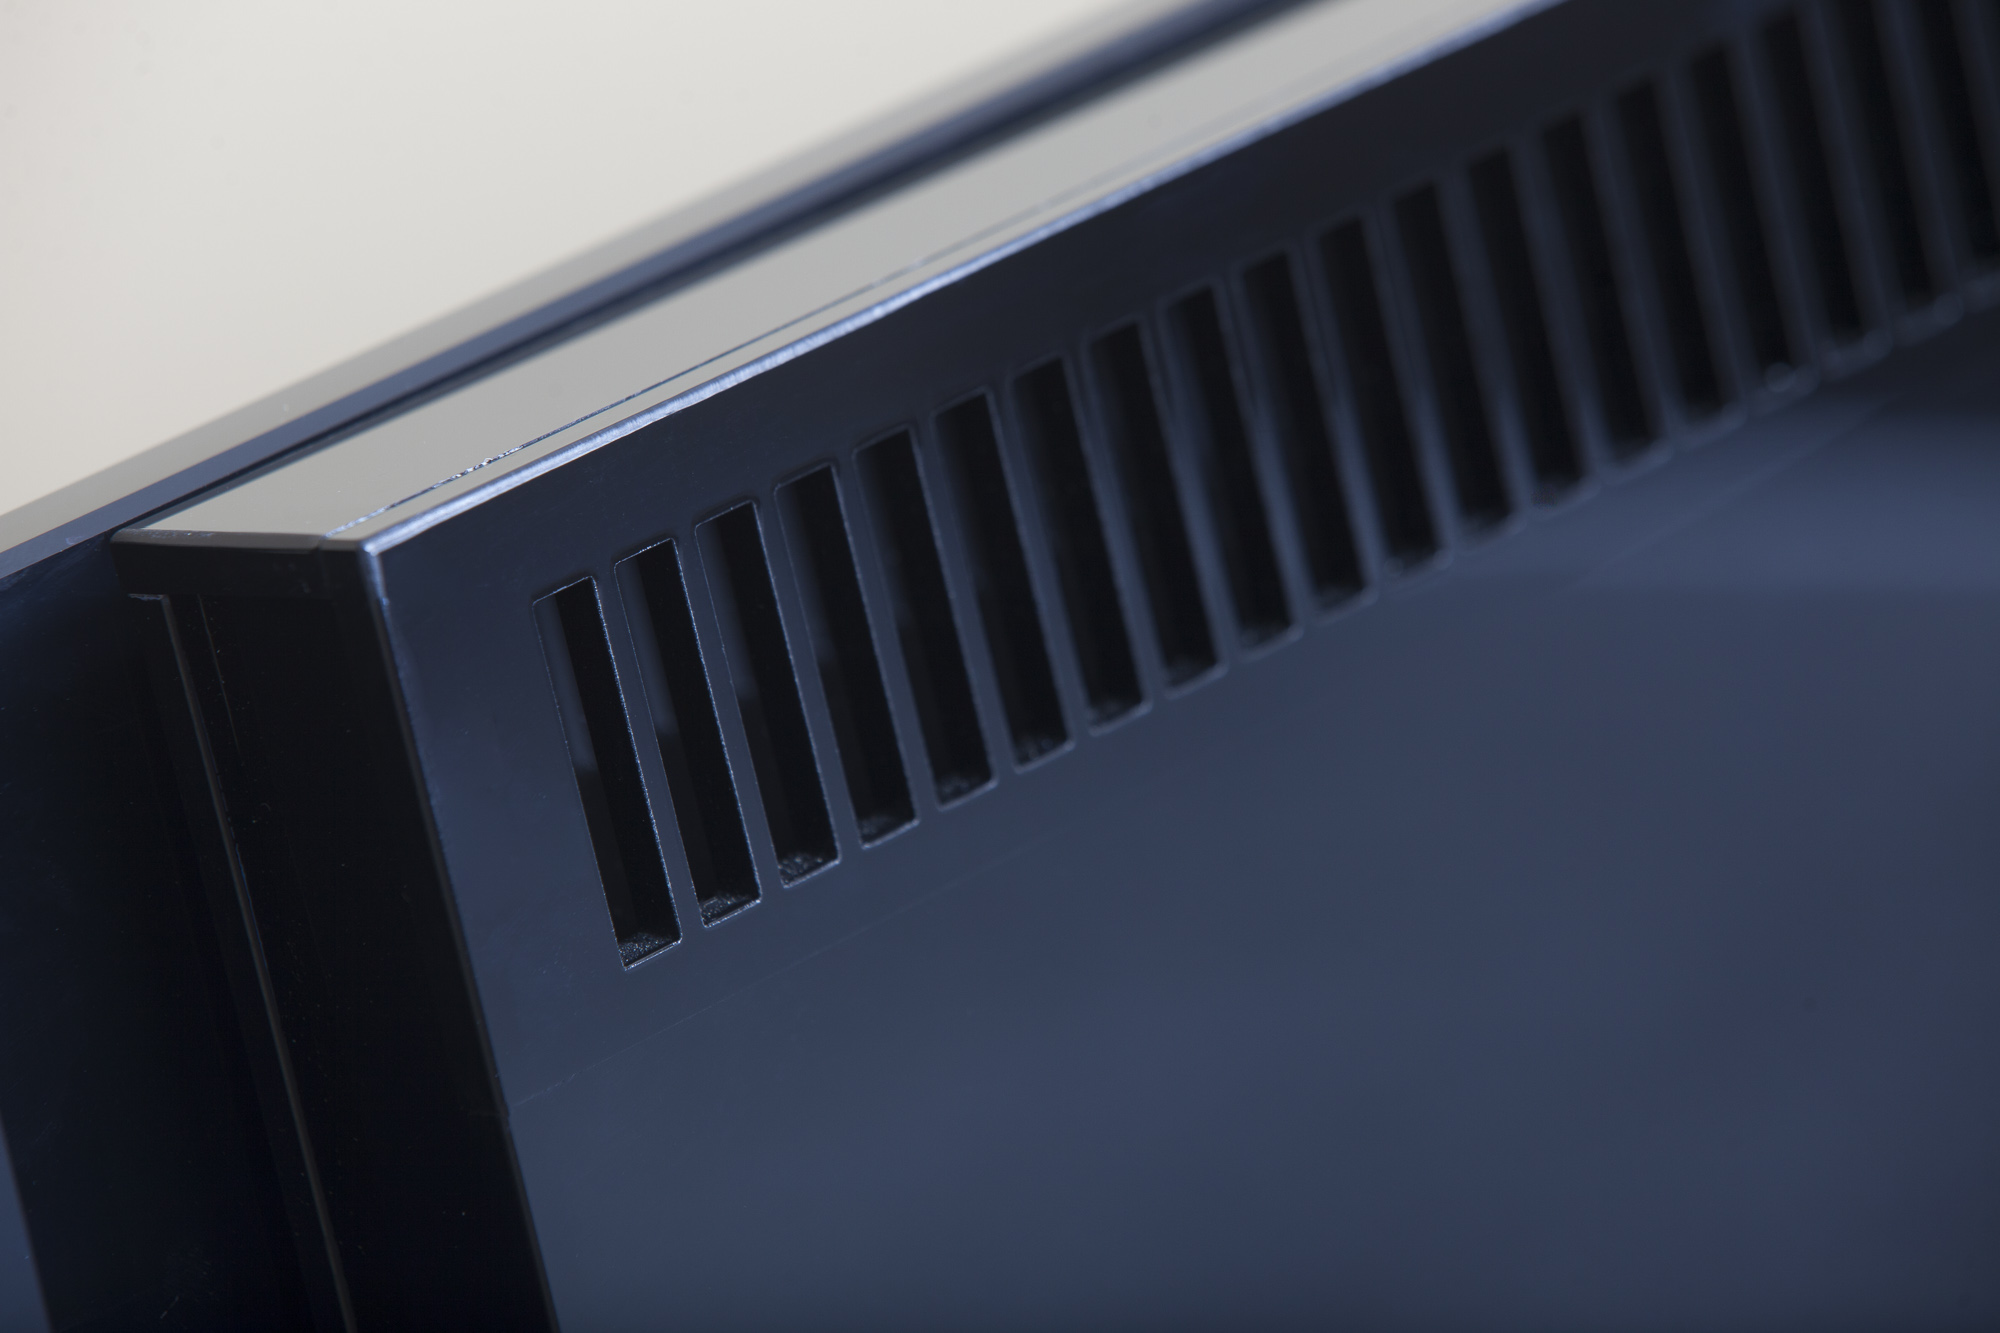
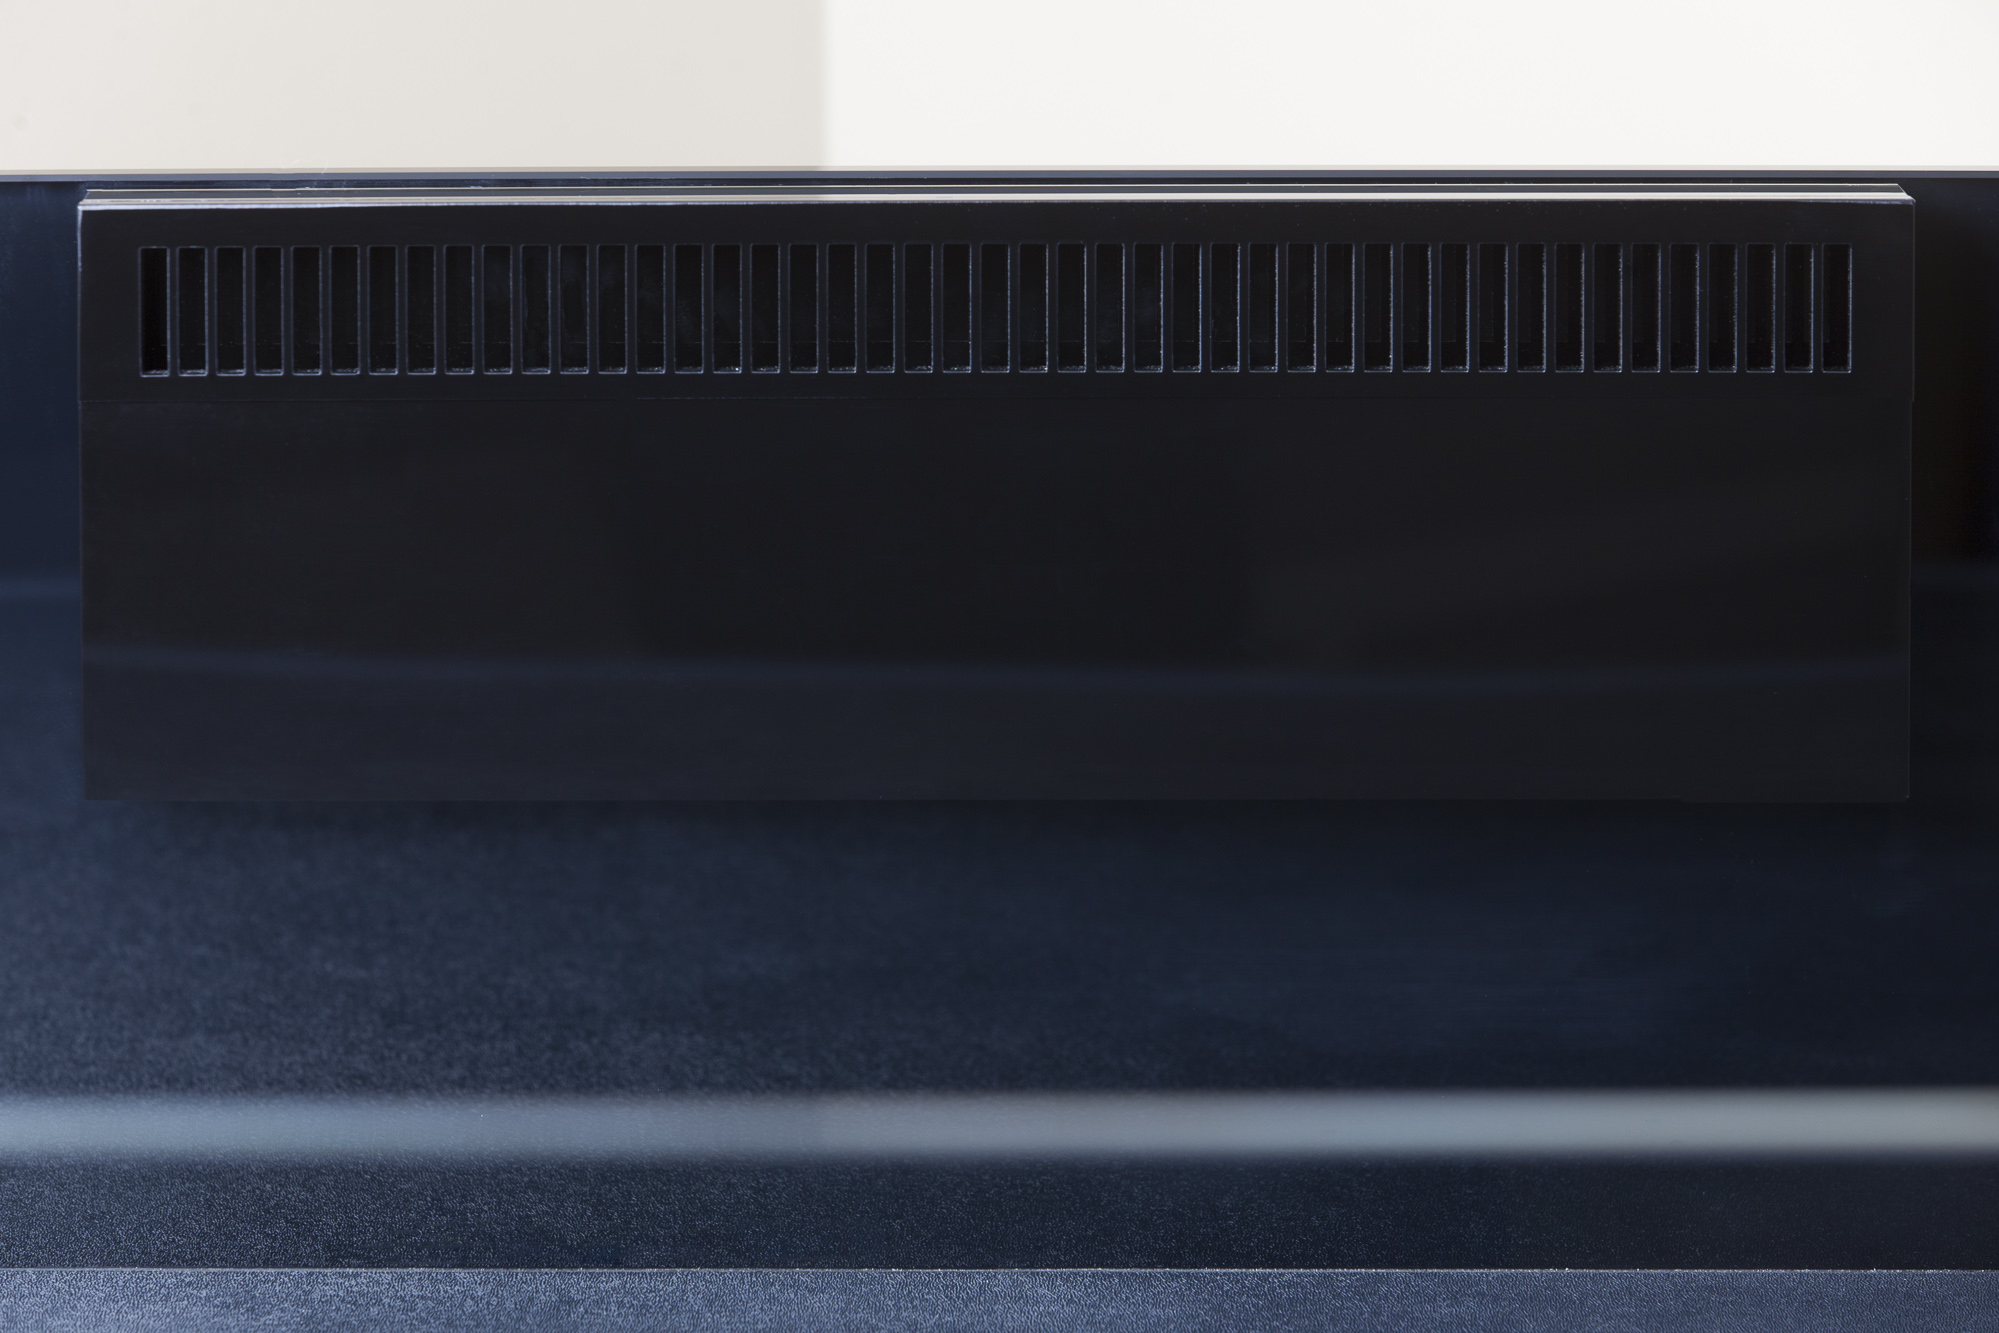
The doors don't have any handles or latching system, just a groove to grip and pull the top of the door. There is a subtle silver band that runs along the inside edge of the door, which has a "brushed aluminum" look and add a little character.

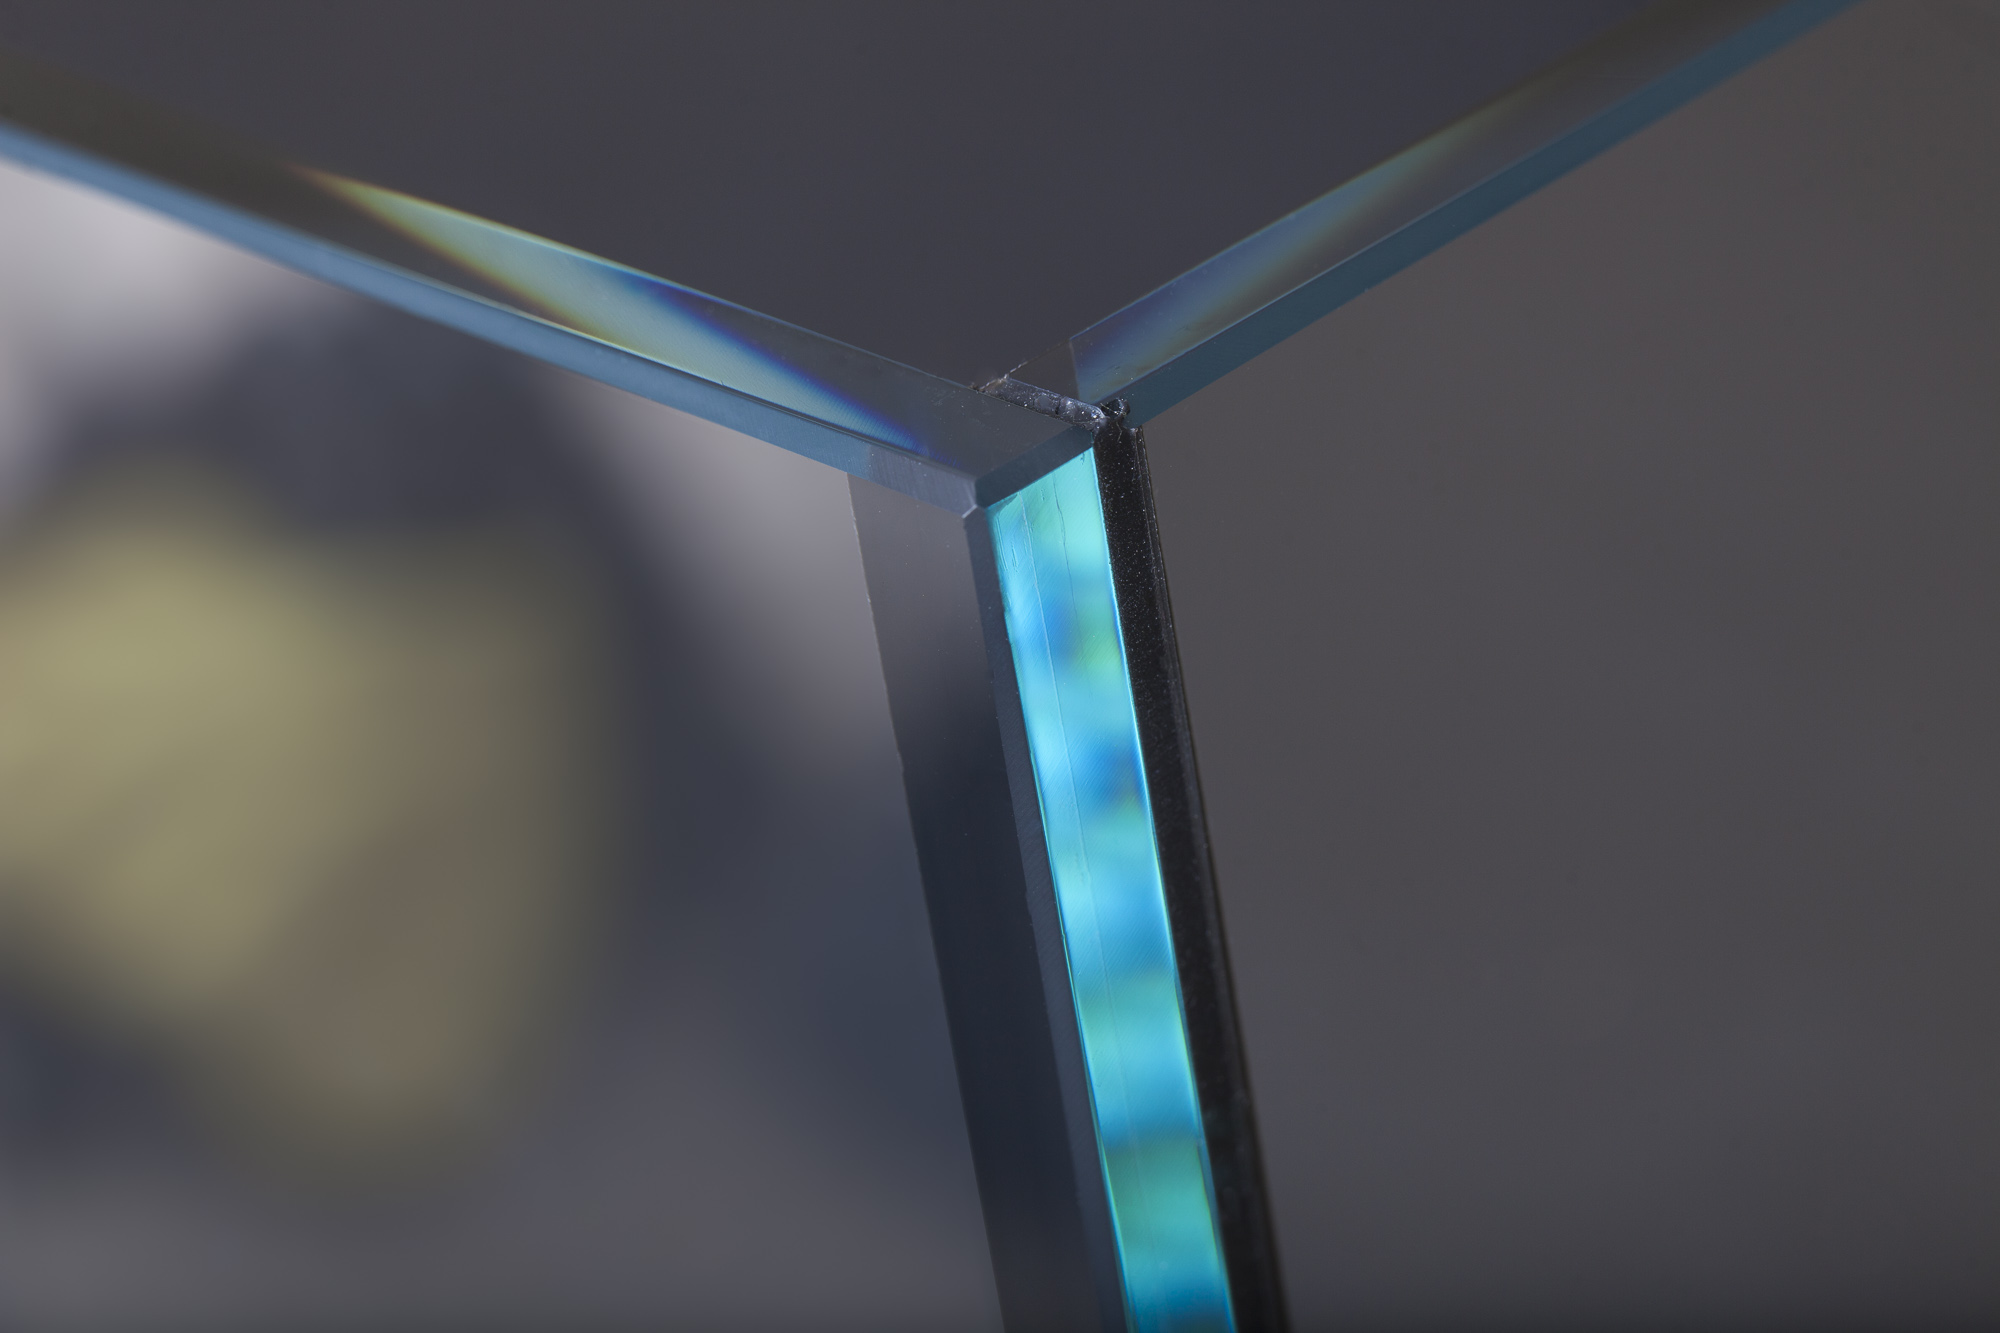
The glass is low iron, with the exception of the rear panel which is standard glass that's been blacked out. All of the panels have a beveled edge and are held together with black silicon. The glass measured from the outside is 12"H but the actual water level should be about 10 inches. No rims or bracing, just the way I like it.
The 1" Phantom Bottom covers the lower surface of the aquarium, and has a slight texture. Since there won't be any substrate in this system, it will be interesting to see if this is difficult to keep clean. This is constructed of layered ¾" glass and ¼" PVC.

The Ghost Overflow is far and away the coolest approach to an overflow that I've encountered. The inside portion extends only an inch or so into the aquarium and the actual overflow reservoir sits behind, attached via dual 1" bulkheads. The return holes are spaced 30" apart on either side of the overflow just below the water line.
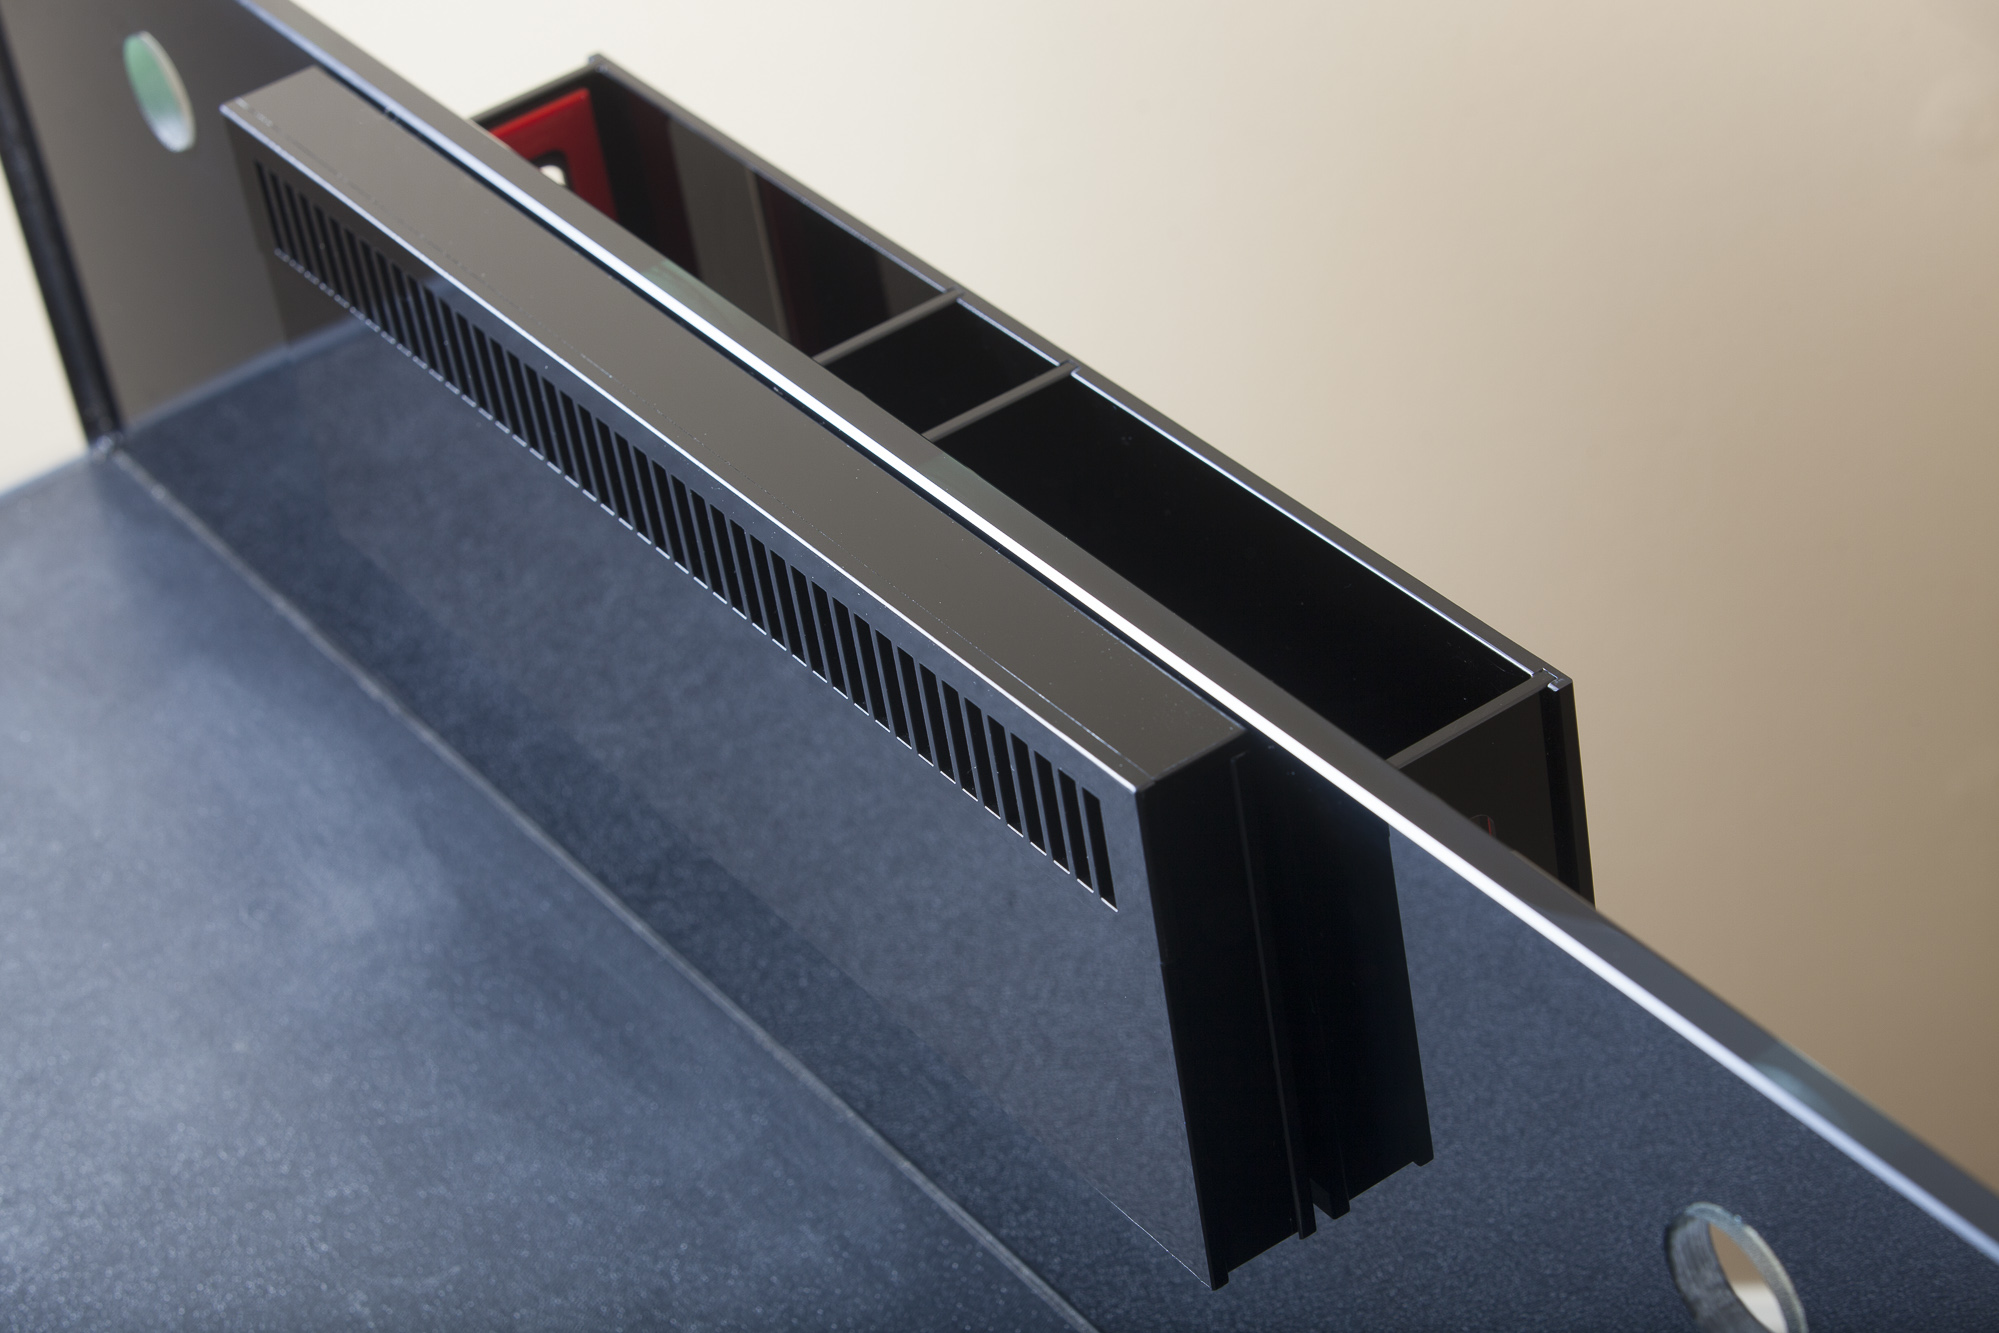
The inside portion has a magnetically coupled grate that can be removed for cleaning or to work on the inside.
Here is a good profile view of the overflow footprint on the rear panel. The dimensions are 18"L x 6"H.
From the top, the drilled holes can be seen where the water passes through to the outside chamber. This newer system has three threaded ¾" outlets for plumbing various overflow styles. I'll probably go with Bean animal for this build. There is also a clear cover that sits atop the entire rear section, which isn't pictured here.
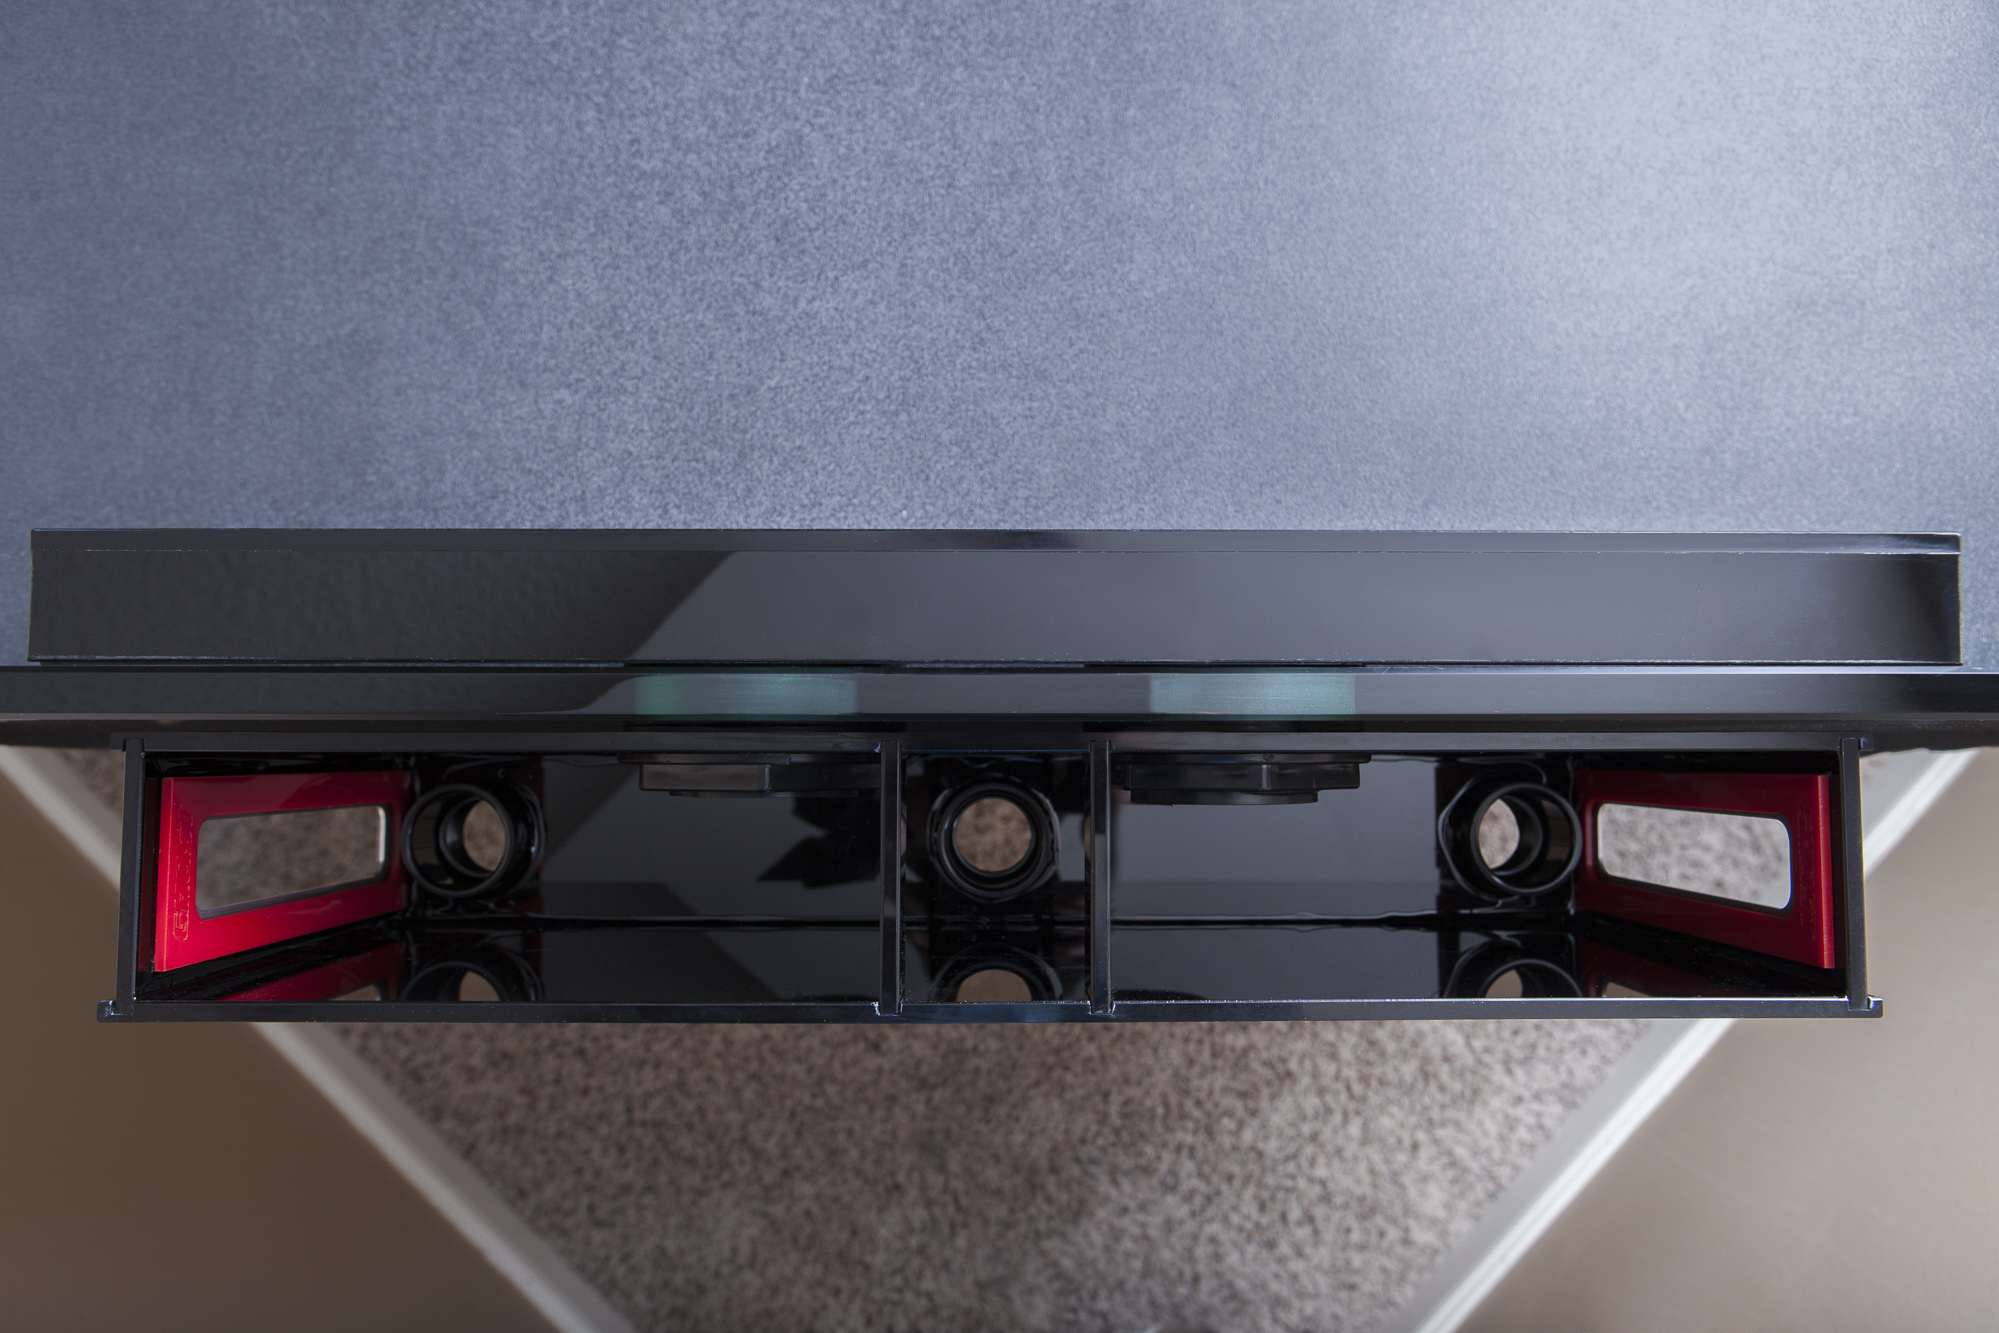
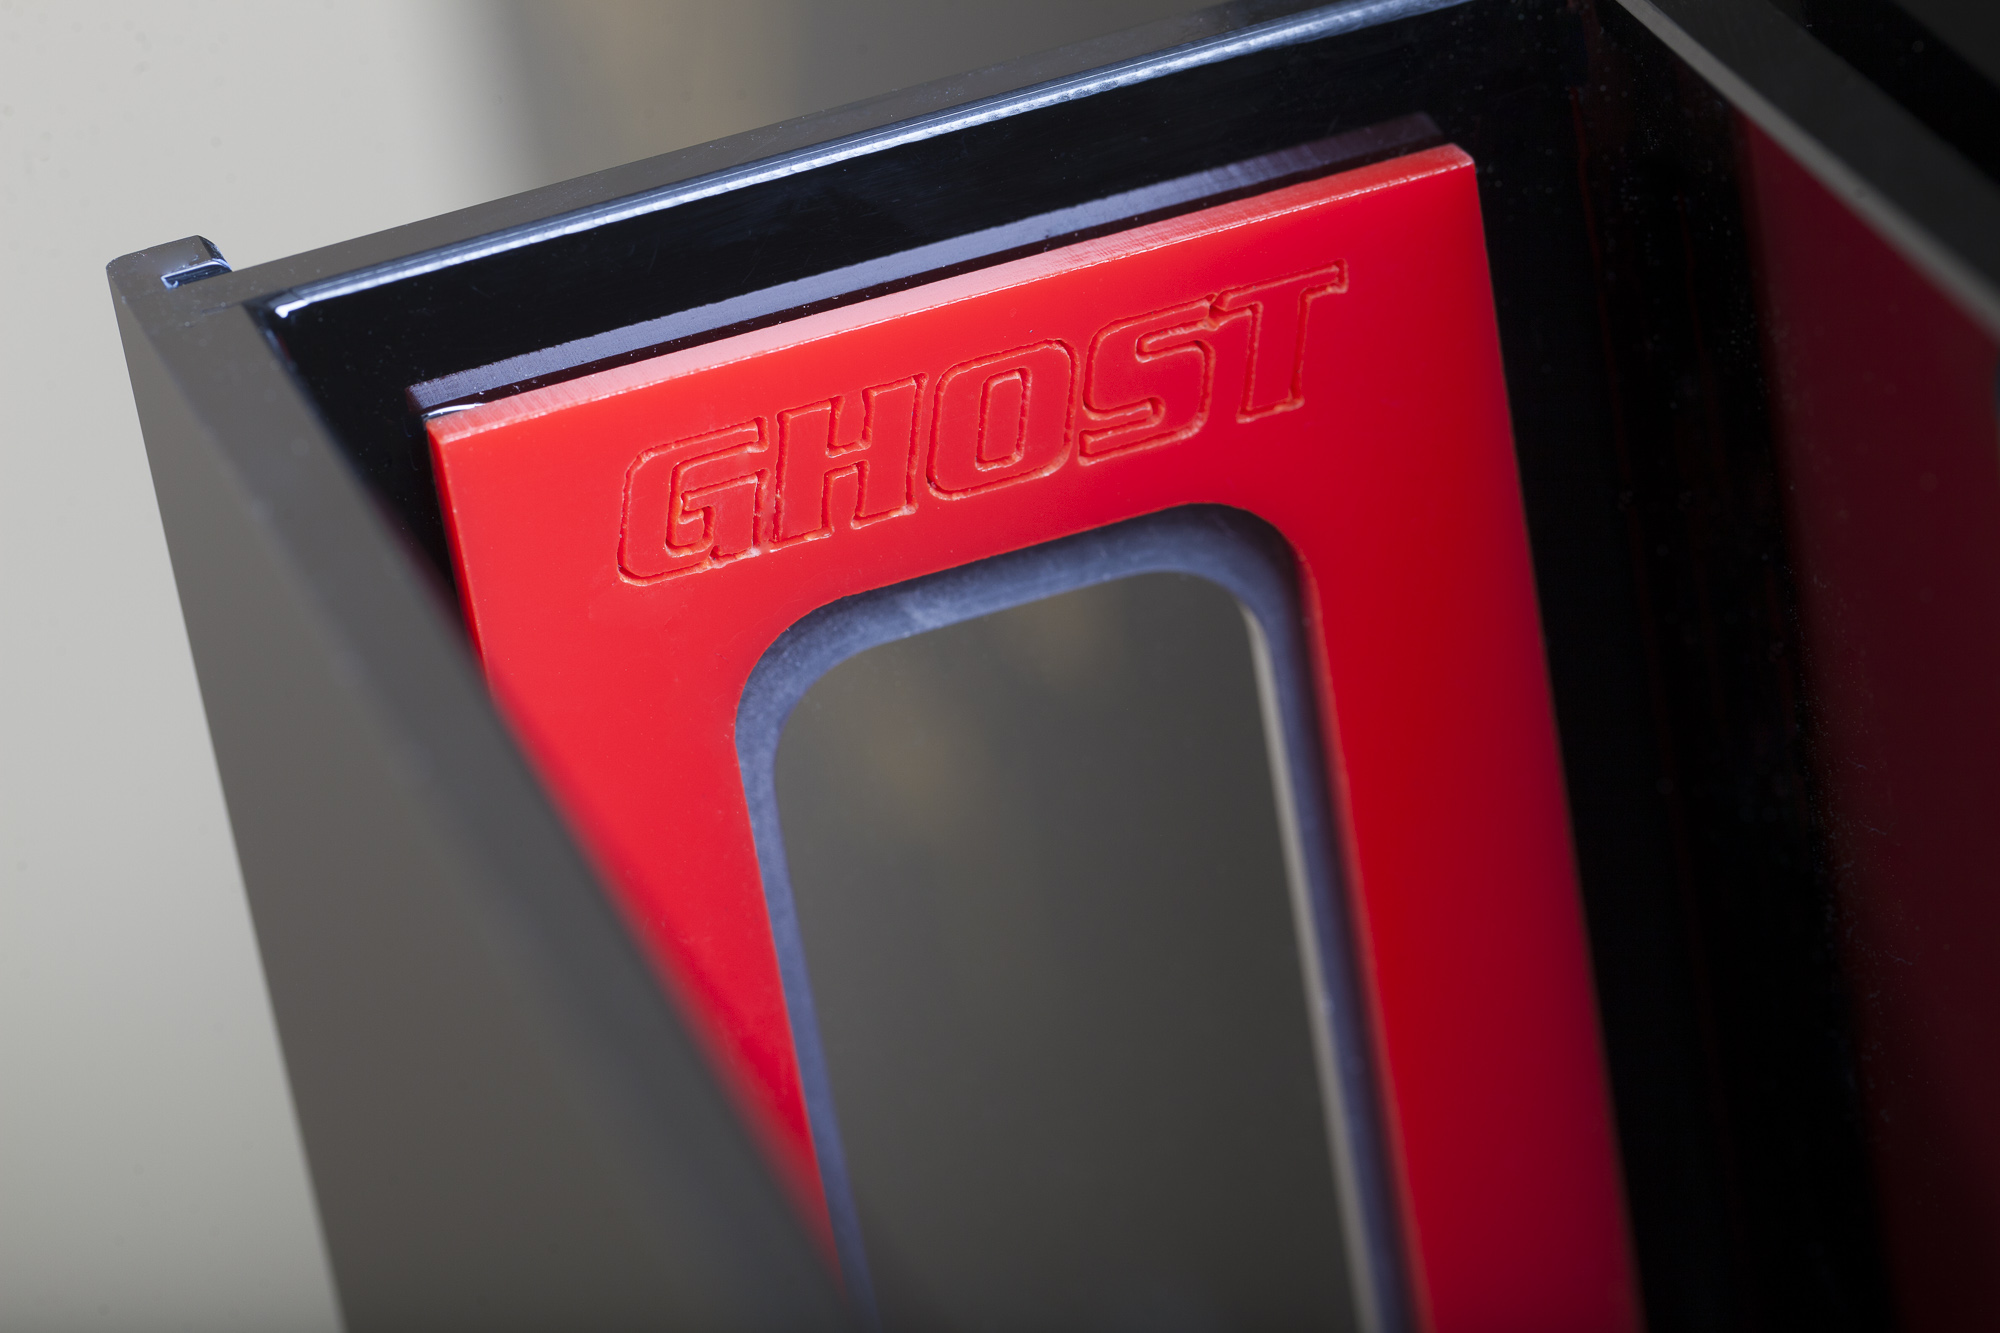
There are also windows to view the outside portion of the overflow box from the sides, which feature some fancy engraving. I really want to avoid red plumbing, as it's been beaten to death but damn it's cool. I might have to just fall in line. The forethought and build quality of this component has me leaning toward a Synergy Reef sump system.
That's all for now!

The build quality of the aquarium is excellent, on par with ELOS which sets a pretty high standard in my opinion. The stand itself is better in every way. I believe the position in the room will end up being neither of my two options from earlier, but what Jason had suggested. For now, it's been placed away from the wall so that I have room to work through the plumbing.

Access is going to be very good, but given the dimensions it has to be. Originally I had planned on having two sets of doors but Felix at Reef Savvy suggested that we do all three sides in case it didn't end up as a corner tank. I'm glad he did. All of the outside surfaces are high gloss white, and the inside is a matte white on the bottom and side walls. The rear of the stand is unpainted and has a 16"x20" opening to route the plumbing from the overflow. My initial thought was to place the sump against the rear wall since that's the shortest route to the overflow, but I'm considering putting it up against one of the doorways for easier maintenance. There is going to be a good deal of unused room under the stand, so I'm considering another little system for the purposes of coral quarantine underneath.

The doors don't have any handles or latching system, just a groove to grip and pull the top of the door. There is a subtle silver band that runs along the inside edge of the door, which has a "brushed aluminum" look and add a little character.

The glass is low iron, with the exception of the rear panel which is standard glass that's been blacked out. All of the panels have a beveled edge and are held together with black silicon. The glass measured from the outside is 12"H but the actual water level should be about 10 inches. No rims or bracing, just the way I like it.

The 1" Phantom Bottom covers the lower surface of the aquarium, and has a slight texture. Since there won't be any substrate in this system, it will be interesting to see if this is difficult to keep clean. This is constructed of layered ¾" glass and ¼" PVC.

The Ghost Overflow is far and away the coolest approach to an overflow that I've encountered. The inside portion extends only an inch or so into the aquarium and the actual overflow reservoir sits behind, attached via dual 1" bulkheads. The return holes are spaced 30" apart on either side of the overflow just below the water line.

The inside portion has a magnetically coupled grate that can be removed for cleaning or to work on the inside.

Here is a good profile view of the overflow footprint on the rear panel. The dimensions are 18"L x 6"H.

From the top, the drilled holes can be seen where the water passes through to the outside chamber. This newer system has three threaded ¾" outlets for plumbing various overflow styles. I'll probably go with Bean animal for this build. There is also a clear cover that sits atop the entire rear section, which isn't pictured here.

There are also windows to view the outside portion of the overflow box from the sides, which feature some fancy engraving. I really want to avoid red plumbing, as it's been beaten to death but damn it's cool. I might have to just fall in line. The forethought and build quality of this component has me leaning toward a Synergy Reef sump system.

That's all for now!

Last edited:
Looks sweet so far! Now plumb it and get it wet :nuts:
veloboy
Senior Member
Wow, impressive, even for Reef Savvy. Very sexy.
jlanger
@thatfishcookieguy
Lifetime Member
Event Committee
Meeting Host 2020
Meeting Host 2021
Meeting Host 2022
I'm really impressed with all of this! I want one. NOW!!
The attention to detail on every little component satisfies my OCD; so :biggthumpup:
The Ghost Overflow is a work of art. The finger pull edging on the doors is a nice touch. And going with a white stand was the right choice for your decor.
Your idea of an offset sump along a side door sounds great.
That method would leave you with plenty of access to the rest of the area inside the stand for "gizmos and gadgets aplenty." (Anyone?)
This does meant that your plumbing will have to meet Felix's standards; which I know you're very capable of doing.
Cannot wait to see the progression of this build. Great start!
So... When are you painting the walls blue? :tongue:
OP
OP
...So... When are you painting the walls blue? :tongue:
Luckily I get to skip that part with the solid color backing.
OP
OP
I'm starting the plumbing process. Everything will be hard plumbed with a red and gray scheme. I ordered a few of those tapered color fittings in black and white but wasn't feeling either one, so I'm sticking with standard "Schedule 80 Gray", which makes things easier anyway and looks good with the quality unions and valves. I dug the old Vertex 150 out of the box, which I won a year ago in a photo contest. I tried to sell it, but luckily no one ever snagged it so that's taken care of.
The sump will be a Synergy Reef CL-34 with a new color scheme they call "Red Mercury", which is a cool laminate two-tone with black and red, and a 10 gallon top off reservoir to match. The sump is pretty standard except the addition of a built-in probe holder and RGB LED lighting. Yes, I will have to plug in my sump. What has reefing come to? :freak6:
The sump is currently being assembled and should arrive at the end of next week, at which point I'll get started on the actual plumbing. I'm also working with Jason to create the perfect frag rack system, so if anyone wants something from him, well you'll just have to wait. :tongue:
Last edited:
jlanger
@thatfishcookieguy
Lifetime Member
Event Committee
Meeting Host 2020
Meeting Host 2021
Meeting Host 2022
I'm also working with Jason to create the perfect frag rack system, so if anyone wants something from him, well you'll just have to wait. :tongue:
So... Am I on retainer?
With a black and red sump, black and red tank and overflow, does this call for black and red frag racks?
So... Am I on retainer?
With a black and red sump, black and red tank and overflow, does this call for black and red frag racks?
As If you had to ask......
OP
OP
Not much for updates.. Sump arrives tomorrow so I should be able to tackle plumbing this weekend.
To keep myself busy, I've been playing with the Phillips Hue lighting system and installed some LED strip lights underneath the stand for general illumination. Their strip light kit can be cut to length, is wirelessly controlled, and has an exposed API. Some cool things could be done, like changing intensity or color based on which doors are opened, by time of day, or signal a tank parameter. Project for another time. Here are some pictures of a few different colors but if popular opinion is accurate, I'll just go with red.
Sump tour tomorrow.
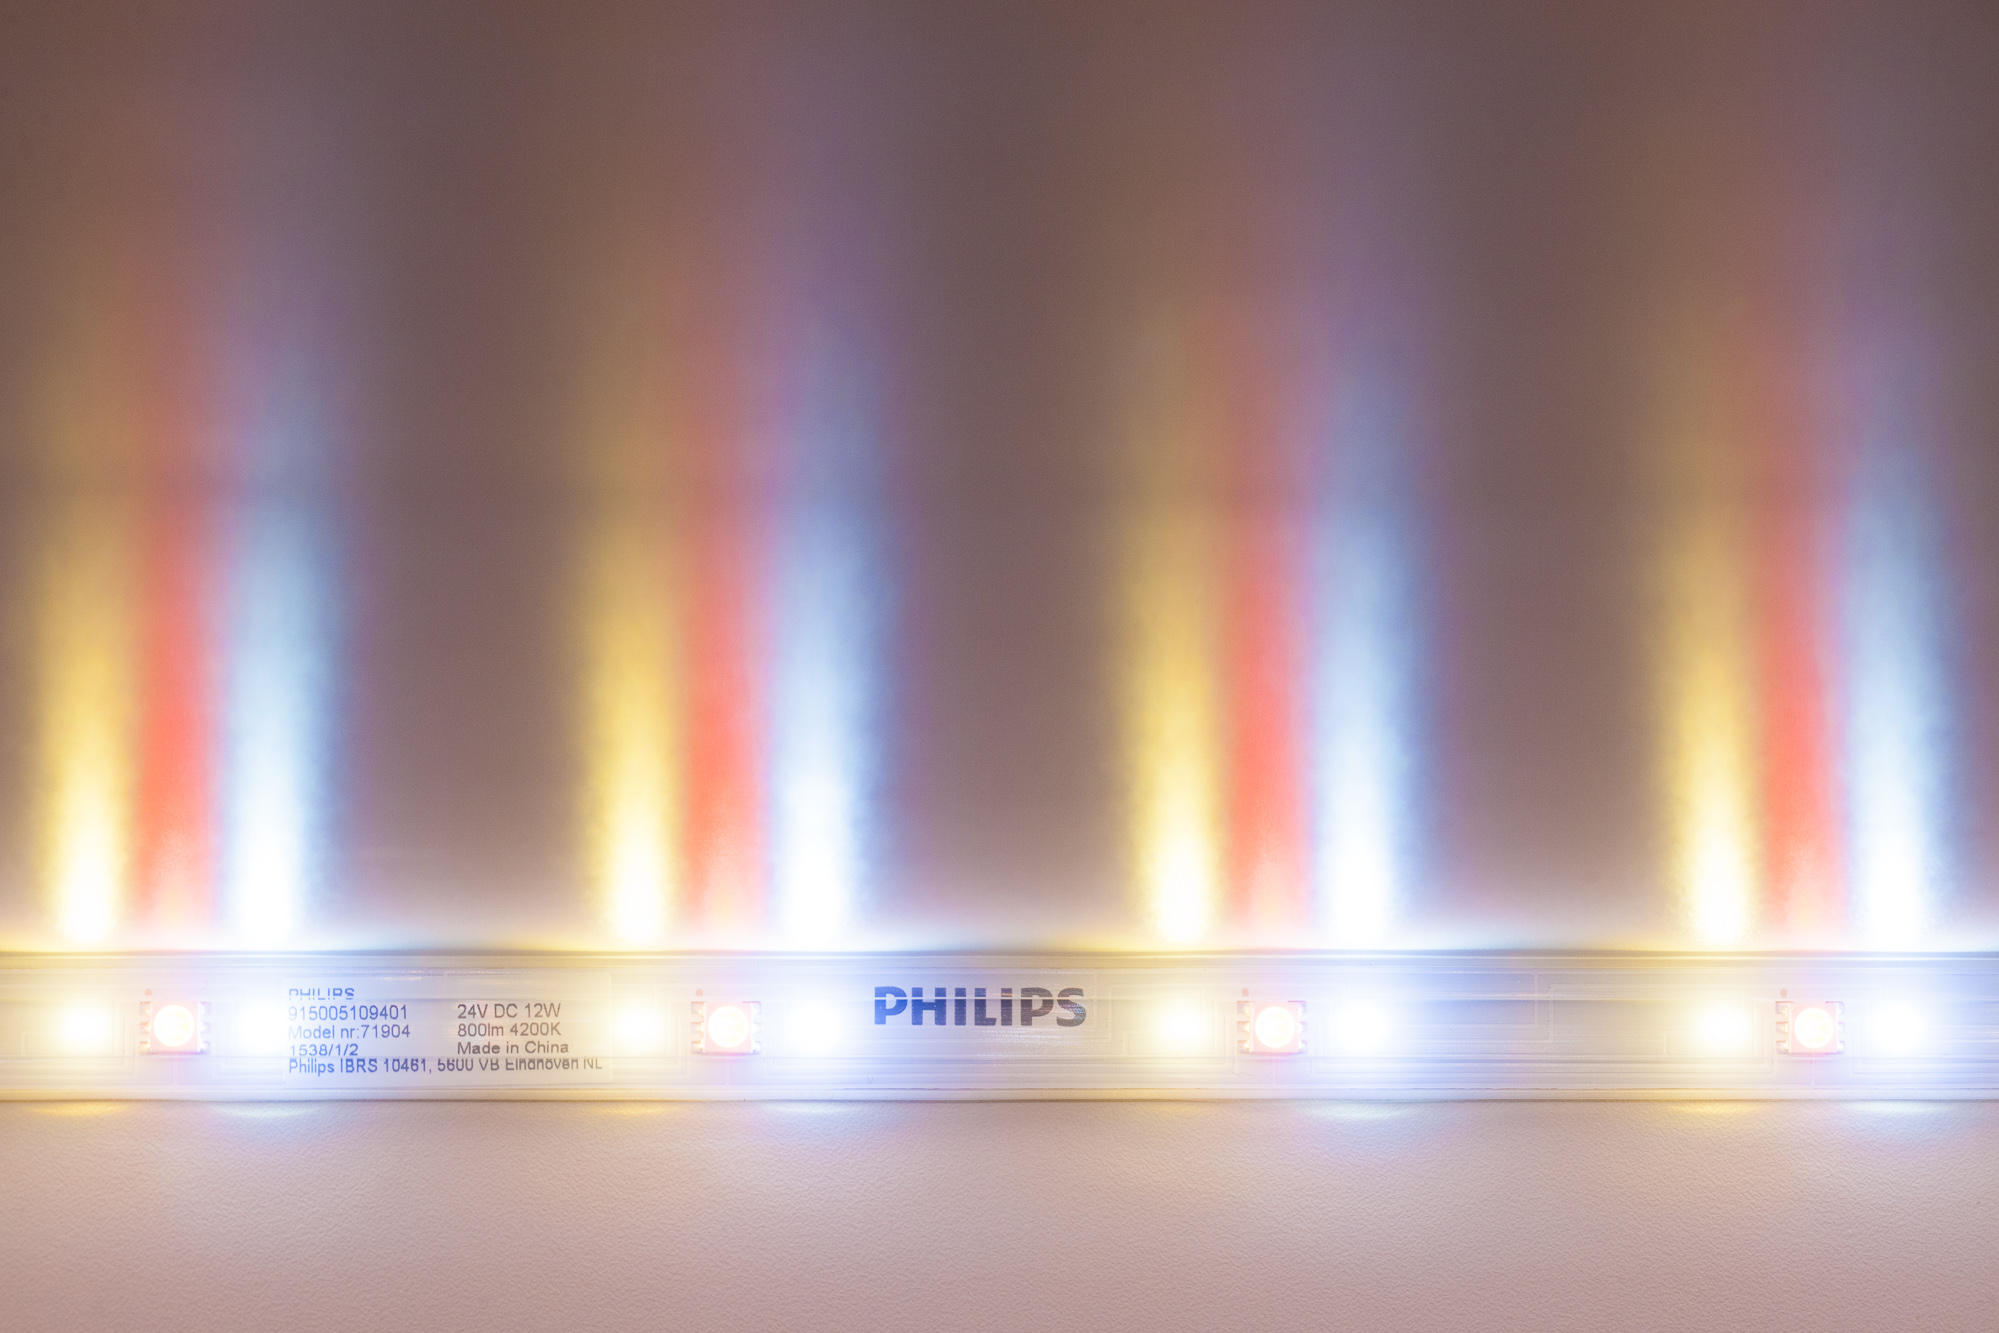
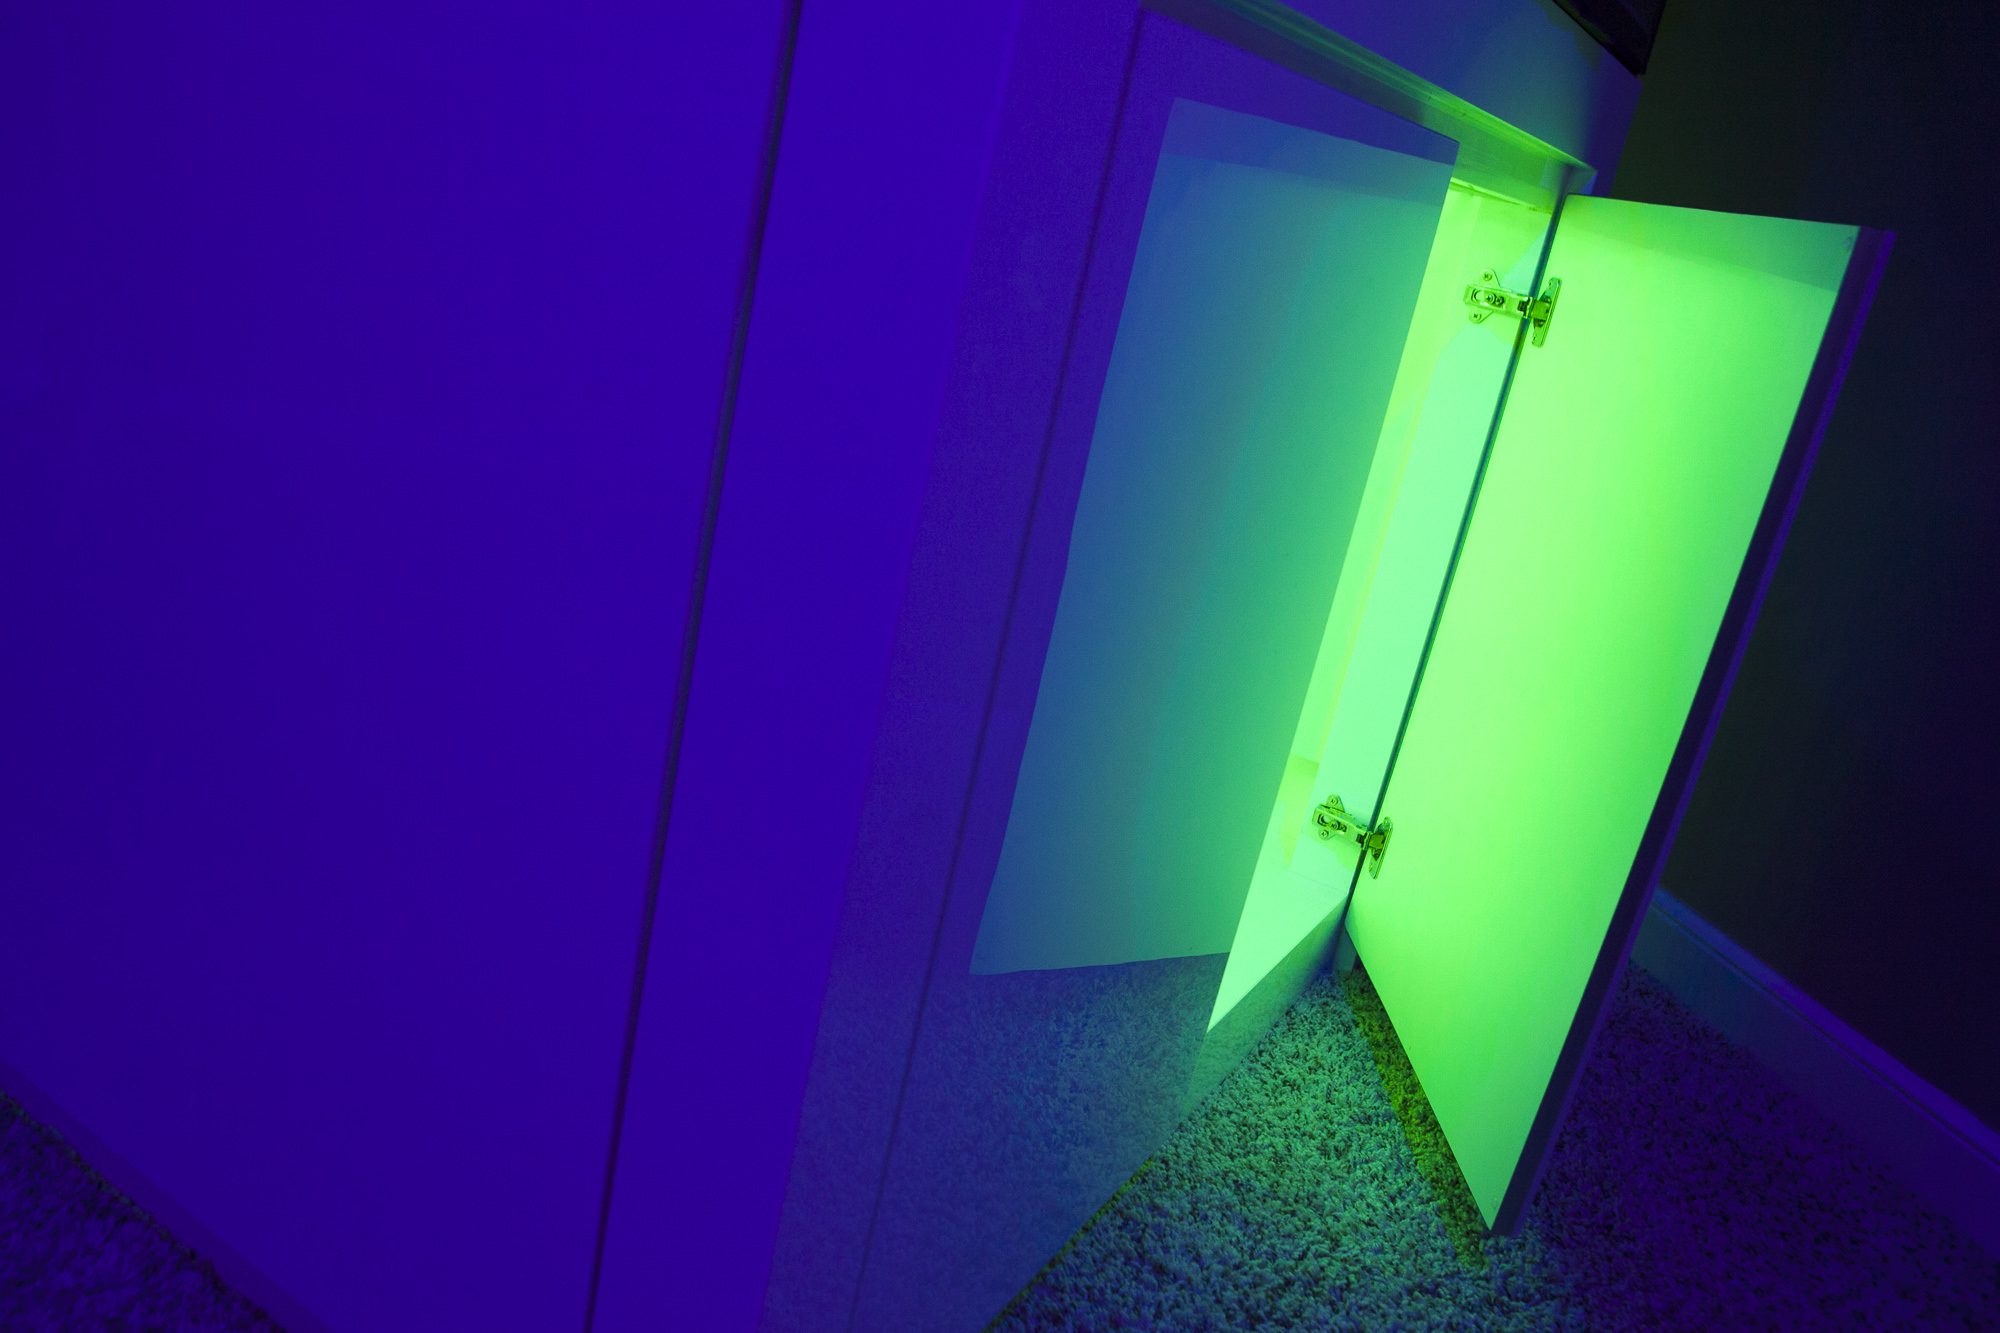
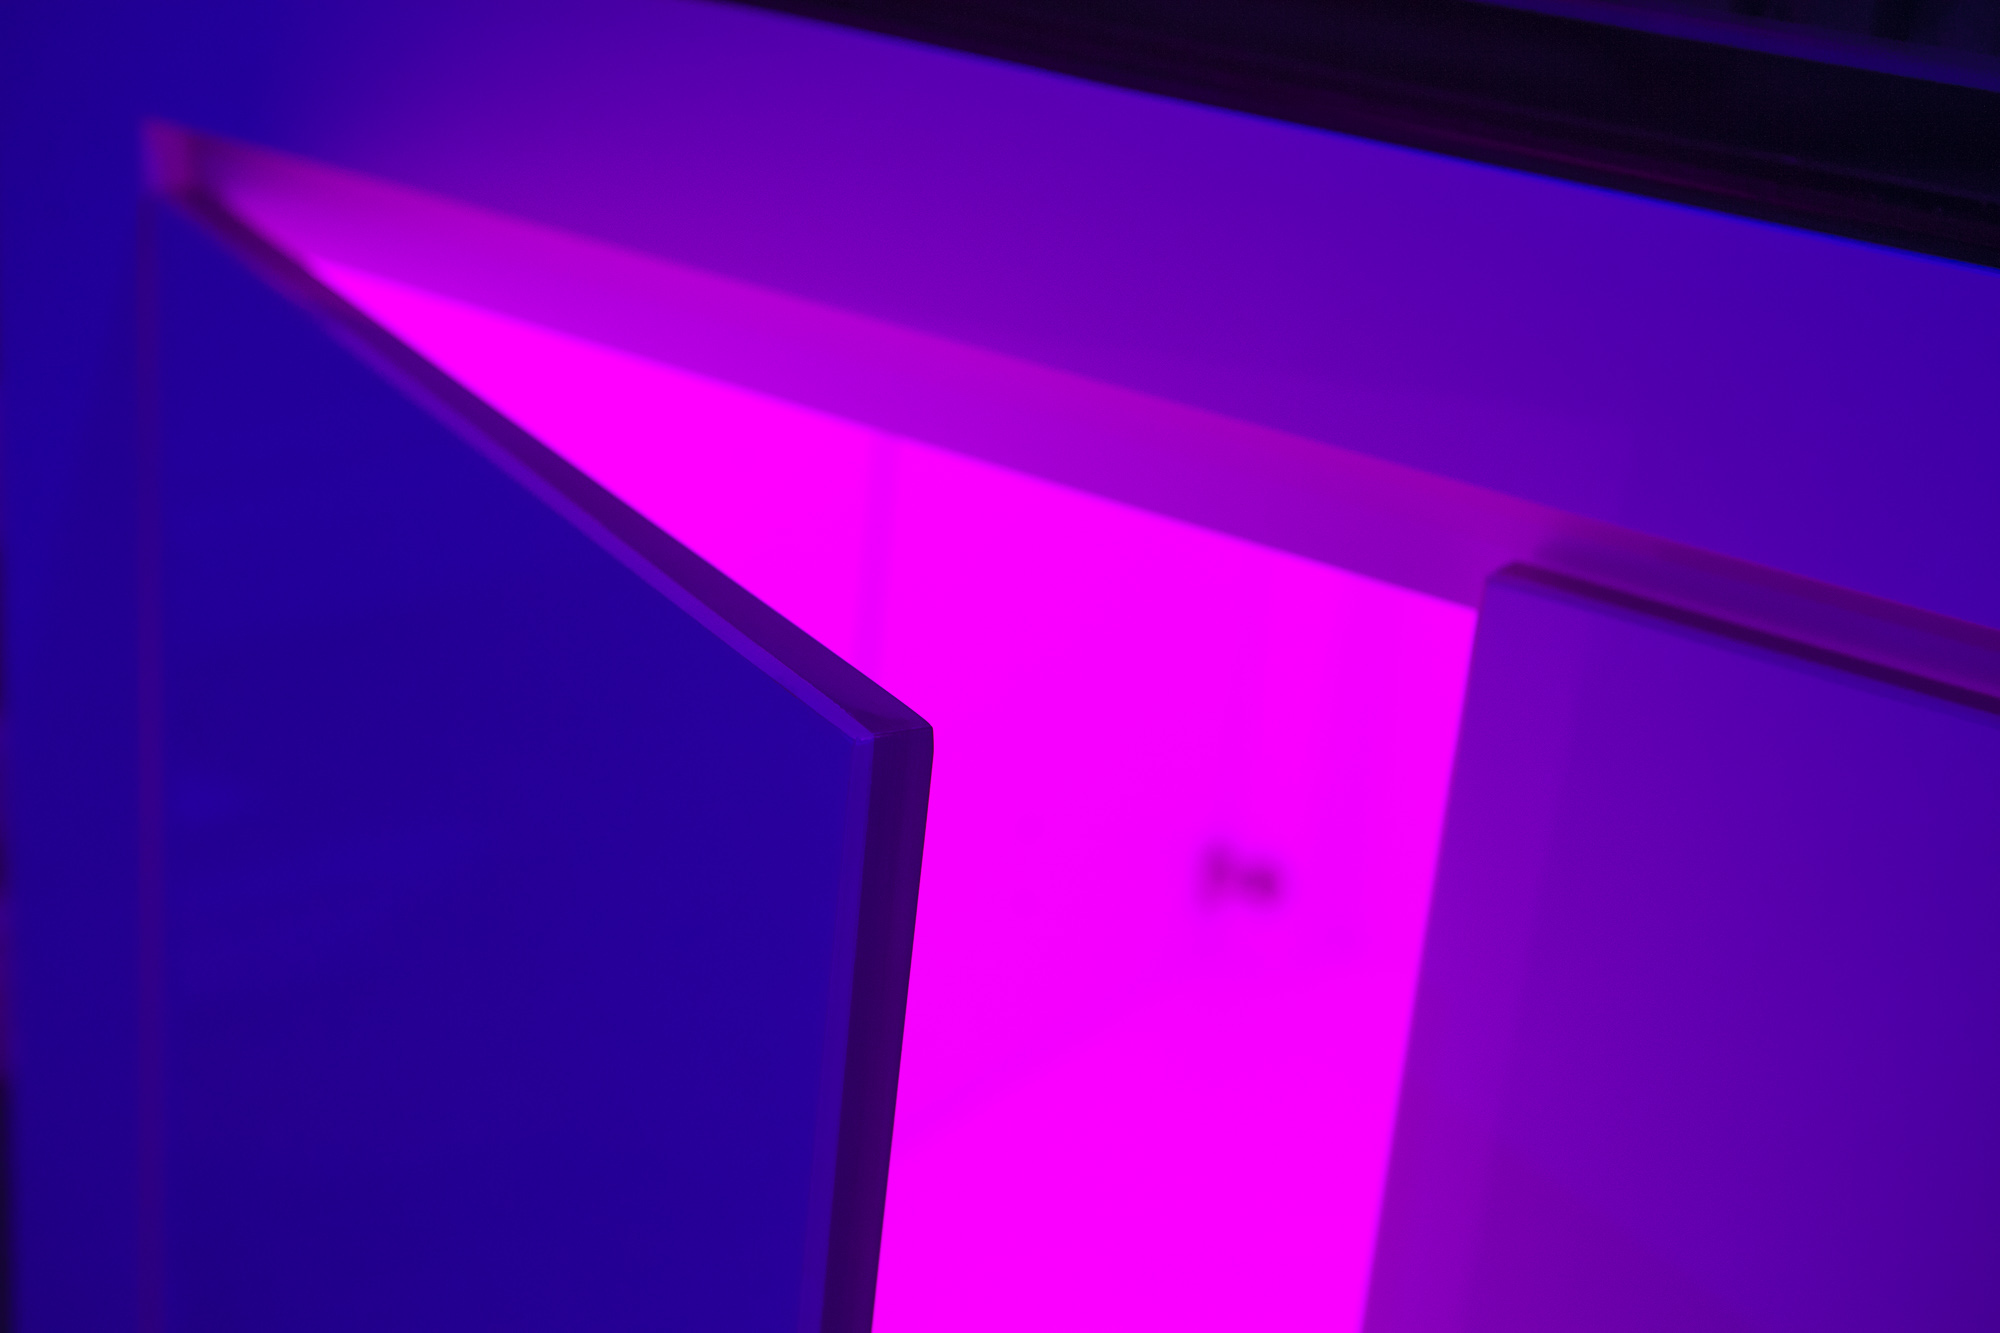
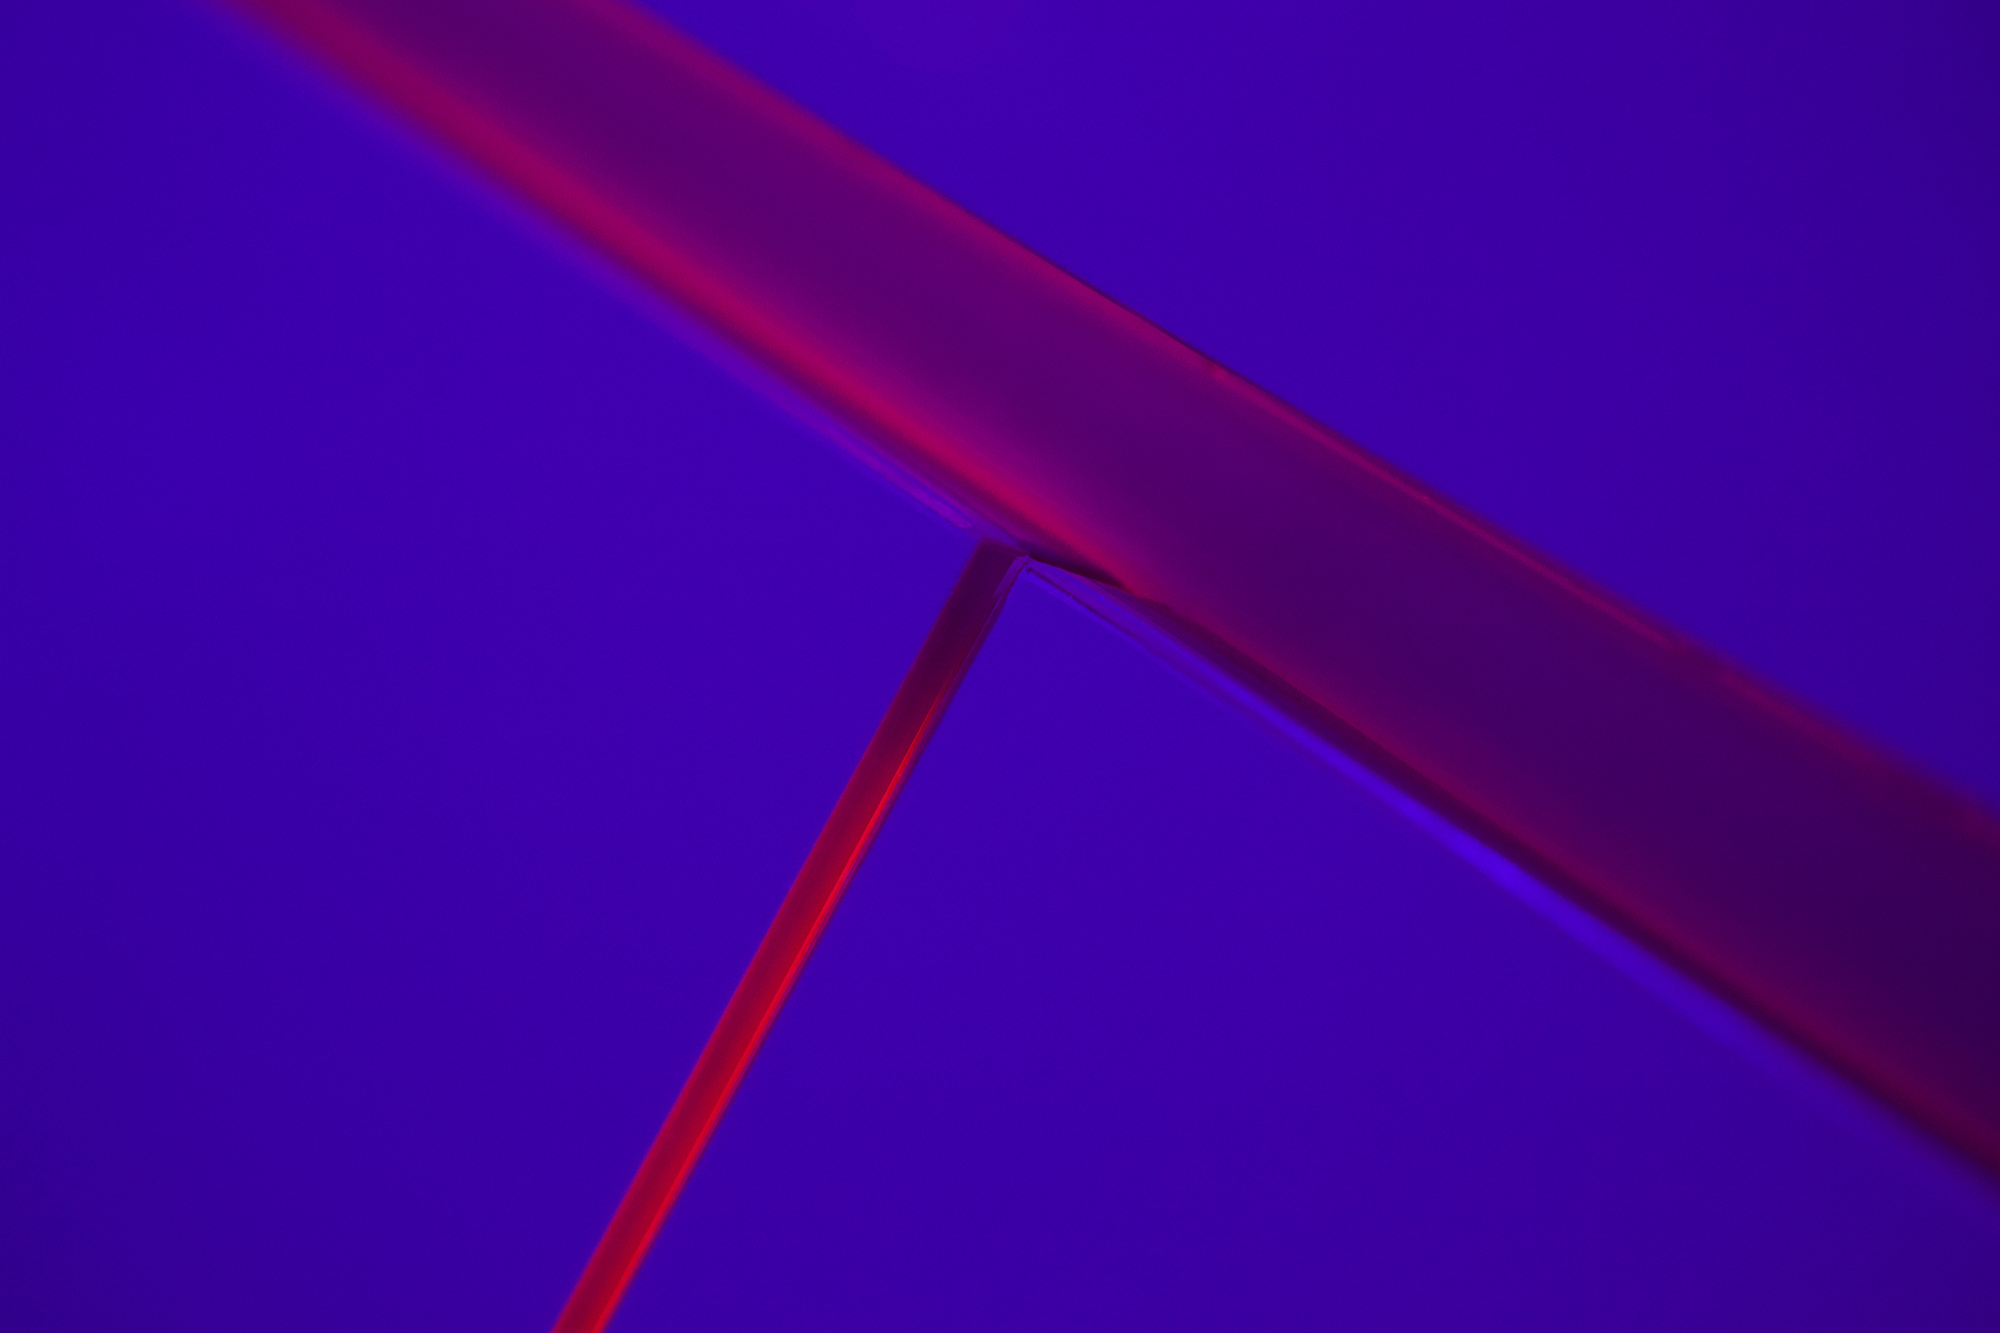


acharpenter
Pitas' Pita
Lifetime Member
Event Committee
Meeting Host 2020
Meeting Host 2021
Meeting Host 2022
And there it is... Marty was helpful. :silly:
Most incorrect comment eva!!!!!!!!!!
I have been following this thread and now I understand why peeps give me crap for slow build threads!
Must see!!!!
Users who are viewing this thread
Total: 2 (members: 0, guests: 2)